Most homeowners know how to save energy in the obvious places: turn off lights, adjust the thermostat, seal drafty windows, upgrade appliances.
But one of the most overlooked energy wasters in the home may be sitting quietly in the laundry room.
Your Clothes Dryer!
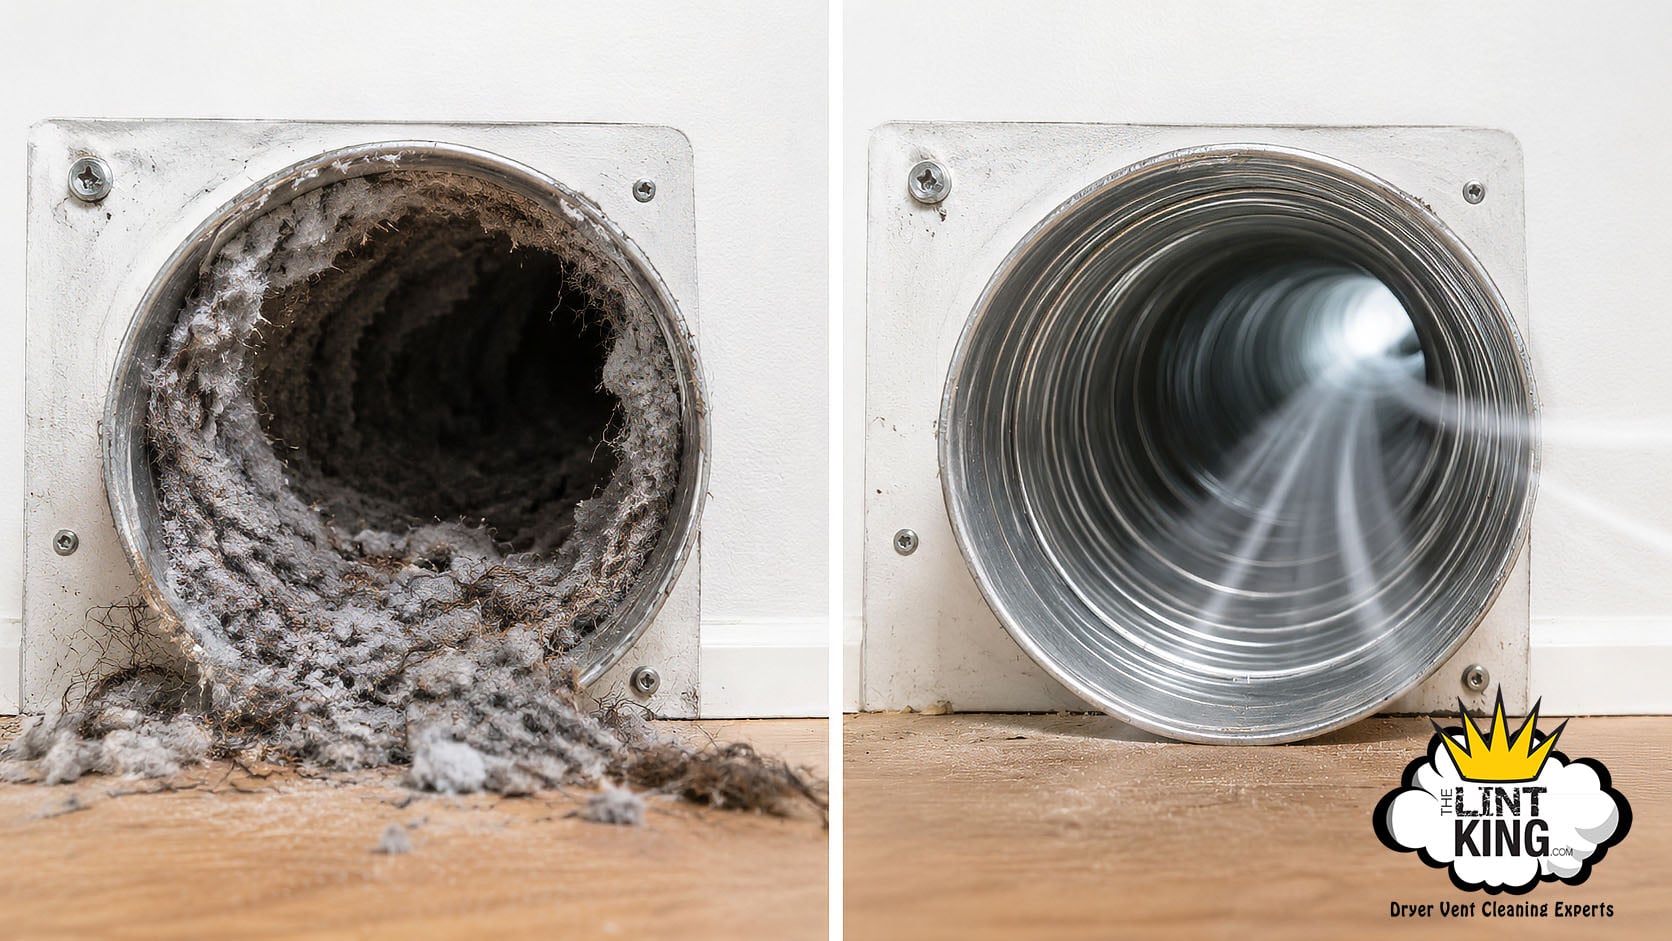
When a dryer vent is clean, air moves freely. Moisture leaves the drum. Clothes dry faster. The appliance does what it was built to do.
When the vent is clogged with lint, pet fur, hair, nesting debris, dust, or crushed ductwork, everything changes. The dryer has to work harder. Loads take longer. Clothes may feel hot but still damp. The laundry room may feel humid. The dryer may run two or three cycles for what should have been one.
That is not just frustrating. It is wasted energy.
At The Lint King – Dryer Vent Cleaning Expert, we have been serving homeowners since 2005, and we have seen the same pattern again and again: people think they need a new dryer, but what they really need is better airflow.
The Dryer Does Not Create Efficiency Alone. Airflow Does.
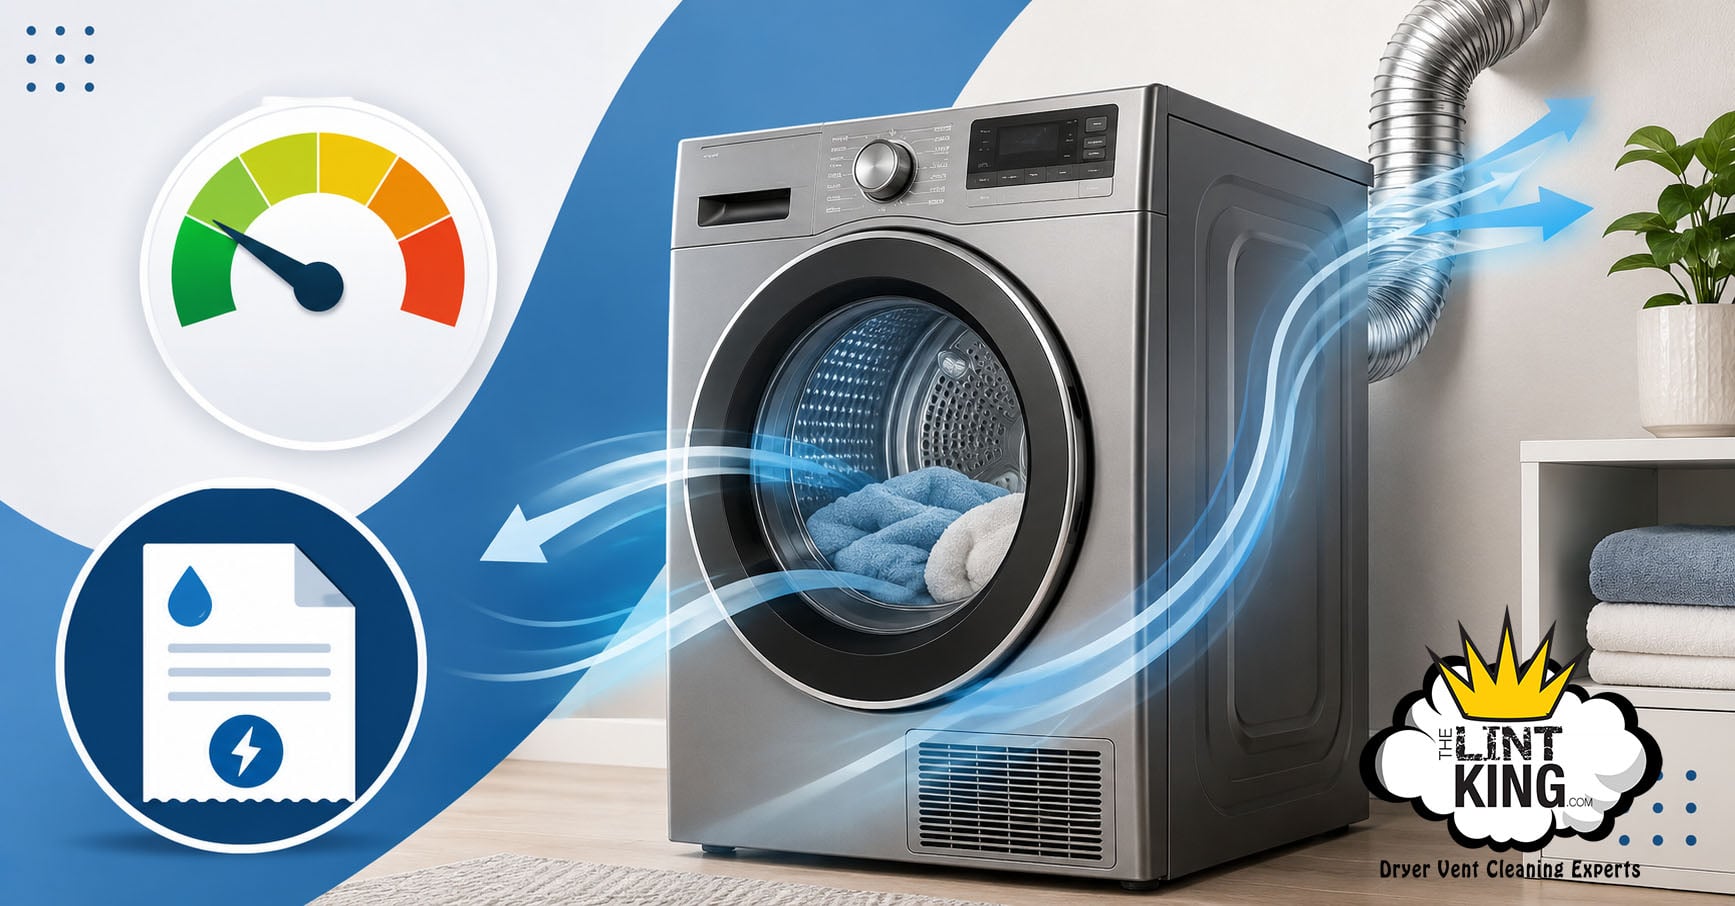
A dryer works by moving heated air through wet clothing and exhausting moisture outside the home. When that airflow is restricted, the dryer cannot remove moisture efficiently.
That means your dryer may be using energy while doing less work.
The U.S. Department of Energy recommends cleaning the lint screen after every load and periodically inspecting the dryer vent to make sure it is not blocked, noting that a clear vent can save energy and may help prevent a fire. ENERGY STAR also recommends cleaning the lint filter after every load to improve air circulation and dryer efficiency.
That lint screen is important, but it is only the first line of defense. Lint still gets past the screen and builds up inside the dryer airway, transition duct, and vent system over time.
Add in long duct runs, multiple bends, roof vents, pet hair, bird nests, moisture, or flexible plastic hose, and your dryer may be fighting a hidden battle every time you press start.
Signs Your Dryer Vent May Be Costing You Money
Your laundry room usually gives you clues before the problem becomes serious.
Watch for these warning signs:
Your clothes take longer than one cycle to dry.
The dryer feels hotter than usual.
The laundry room feels humid or warm.
You notice lint around the exterior vent.
The outside vent flap does not open properly.
Clothes smell musty or overheated.
Your dryer shuts off early or shows airflow-related error codes.
You have pets, a large family, or heavy laundry use.
The Lint King notes that annual cleaning is widely recommended, and if drying takes 60 minutes or longer, the vent should be cleaned as soon as possible.
Small Laundry Habits That Help Save Energy
Dryer vent cleaning is one of the biggest airflow improvements you can make, but it works even better when paired with simple laundry habits.
Clean the lint screen before every load.
Dry full loads, but do not overload the drum.
Separate heavy towels from lighter fabrics.
Use the moisture sensor setting when available.
Avoid over-drying clothes.
Use the cool-down cycle when appropriate.
Vacuum lint from the lint screen slot periodically.
Make sure your dryer vents outdoors, not into an attic, crawlspace, or garage.
Keep the area around the dryer clear.
These small habits help the dryer breathe. And when a dryer can breathe, it can dry faster, run cooler, and use energy more efficiently.
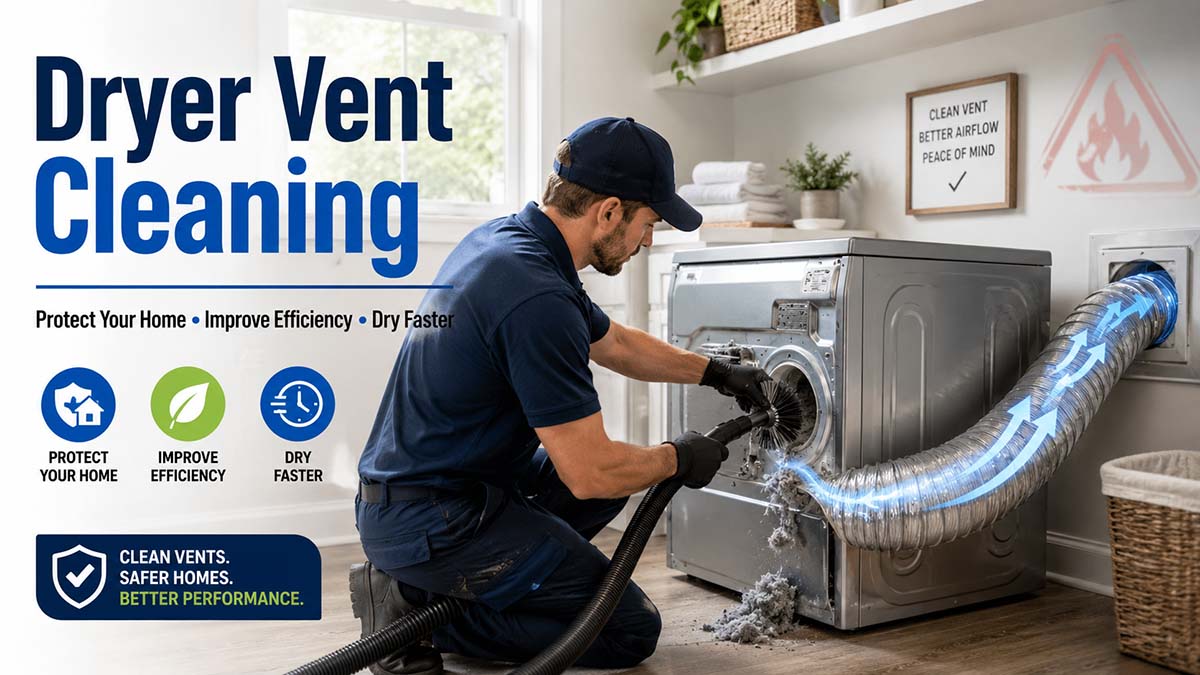
Why Professional Dryer Vent Cleaning Matters
A lint screen can be cleaned by hand. A full dryer vent system often requires the right tools, the right process, and an experienced eye.
The Lint King’s dryer vent cleaning process includes inspection, lint and debris removal, high-powered vacuuming, rotary brush cleaning, cleaning around the lint trap and connection points, and final airflow-focused checks.
That matters because the real clog is not always where homeowners expect it to be.
Sometimes it is behind the dryer.
Sometimes it is inside a long duct run.
Sometimes it is at the roof termination.
Sometimes it is a bird nest.
Sometimes the duct is crushed, disconnected, wet, or made from unsafe material.
A professional cleaning does more than remove lint. It helps identify what is slowing the system down in the first place.
Energy Savings, Safety, and Peace of Mind
A clean dryer vent can help reduce drying time, lower utility costs, extend the life of the dryer, and reduce wear on clothing. The Lint King’s website highlights fire safety, lower utility bills, and faster drying times as key benefits of dryer vent cleaning.
And safety matters. UL Solutions reports that lint caught in dryer vents is a major contributor to dryer fire risk and emphasizes that removing lint from the filter and having the exhaust vent inspected and cleaned helps reduce that risk.
So while dryer vent cleaning may not be the flashiest home improvement project, it is one of the most practical.
It helps your dryer work the way it should.
It helps your laundry room run more efficiently.
It helps protect your appliance, your clothing, and your home.
Join the Royal Court of Laundry Safety & Efficiency
If your dryer is taking too long, running too hot, or making laundry day feel more expensive than it should, it may be time to check the vent.
The Lint King proudly serves homeowners across Northern Illinois with professional dryer vent cleaning, dryer ductwork repair, and bird nest removal. The company’s site promotes a $15 OFF Clothes Dryer Vent Cleaning coupon and notes that homeowners must book online to use the coupon.
Book online for a $15 coupon and give your dryer the airflow it deserves.
Because saving energy in the laundry room starts with one simple question:
When was the last time your dryer vent was cleaned?
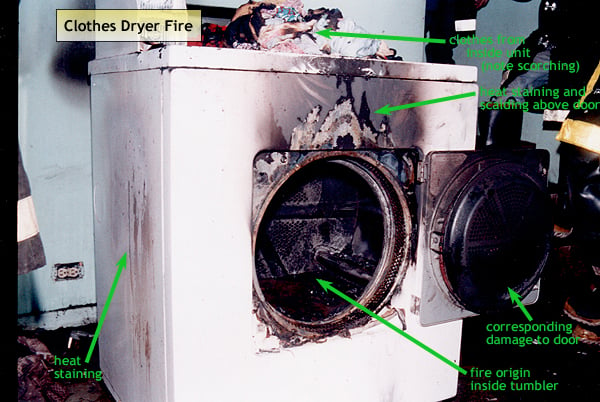
If your dryer suddenly needs two cycles to finish a normal load, your laundry room feels hotter than usual, or you catch a faint burning smell while the dryer is running, the problem may not be the appliance itself. In many homes, the real issue is restricted airflow caused by lint buildup in the vent system. Dryer vent cleaning is one of those maintenance tasks that seems easy to postpone, but it directly affects safety, energy use, and how well your dryer performs. NFPA research estimates that dryers were involved in an average of 13,820 home structure fires per year in 2014–2018, and failure to clean was a contributing factor in nearly one-third of those fires. Warning signs of a dryer fire
Why dryer vent cleaning matters
A dryer works by pushing hot, moist air out of the drum and through the exhaust duct. When lint and dust build up in that pathway, airflow drops. That means longer drying times, more heat trapped in the machine, and more wear on the dryer itself. DOE/PNNL’s Building America guidance notes that cleaning the dryer duct can help clothes dry faster, save energy, and potentially prevent a fire. NFPA also says failure to clean is the leading cause of home clothes-dryer fires.
It also matters how the vent system is built. NFPA recommends metal venting material for proper airflow and drying time, while code guidance limits duct length and treats long, bend-heavy runs as a performance and safety issue. BASC also warns against screened vent caps because they can trap lint at the termination point. In other words, a dryer vent is not just a tube you occasionally vacuum; it is part of a ventilation system that needs the right materials, the right layout, and routine upkeep.
Signs your dryer vent may be clogged
Homeowners usually notice performance problems before they think about maintenance. Strong warning signs include clothes taking longer to dry, clothes feeling unusually hot at the end of a cycle, reduced airflow at the outdoor vent, visible lint around the lint-trap area, excess humidity in the laundry room, and a burning smell while the dryer is operating. This Old House also flags musty-smelling laundry as a sign that moisture is not leaving the system properly, while Home Depot adds that birds or pests near the exterior vent can point to a blockage at the outlet.
If you notice any of those symptoms, do not wait for your annual cleaning window. NFPA’s guidance is to clean the vent pipe at least once a year, or sooner if drying time starts increasing. A dryer that is struggling to breathe is already telling you the schedule needs to move up.
How often should you clean a dryer vent?
Start with the non-negotiables. USFA says to clean the lint filter before and after each cycle, and NFPA says the lint filter should be cleaned before or after every load. Beyond that, a smart homeowner’s schedule includes a quick monthly visual check of the exterior flap and the area behind the dryer, plus a full vent-pipe cleaning at least once a year. If you do laundry constantly, have pets, or notice slow drying, weak exhaust flow, or heat buildup, increase that cadence instead of sticking rigidly to the calendar. Why regular dryer vent cleaning matters
A simple rule works well for most households: clean the lint screen every load, inspect the setup monthly, and deep-clean the vent annually at minimum. If your home runs multiple loads most days, treat the vent system as a heavier-use component and inspect it more aggressively. The point is not to memorize one perfect timetable; it is to respond early when airflow drops.
How to clean a dryer vent safely
Prep the area and shut the machine down
Before you begin, unplug the dryer. If it is a gas model, shut off the gas supply first. Pull the dryer away from the wall far enough to access the back of the machine without crushing the duct. Wear gloves and, if you are sensitive to dust, a mask. Both Home Depot and This Old House frame power shutoff and safe access as the first step, and USFA emphasizes checking that the vent system is not damaged, crushed, or restricted. How to clean a dryer lint trap the right way
Clean from the dryer side out to the termination
Disconnect the transition duct from the back of the dryer and inspect it for tears, crushing, excessive length, or too many bends. Vacuum lint from the back of the dryer, the lint-trap housing, and the duct itself. Then use a dryer-vent brush or cleaning kit to loosen buildup through the run. BASC presents both brush-kit and leaf-blower options, but for most homeowners, a brush-and-vacuum approach is the safer, more controllable method to describe in a general blog post. If you can reach the outside end, remove the exterior cover and clear any lint or debris there as well.
While you are working, pay attention to the vent cap and duct path. The vent should terminate outdoors, not in an attic or crawlspace, and the cap should allow free airflow without a lint-trapping screen. If the duct is long, sharply bent, crushed behind the dryer, or made of flimsy material that traps lint, cleaning may help temporarily, but correction of the vent path may be the real long-term fix.
Reconnect, test, and confirm airflow
Reconnect the duct carefully, making sure the run is as short and direct as practical. Push the dryer back gently so you do not kink or crush the vent. Then run a short air-only or test cycle and confirm that air is moving strongly at the outside termination and that the flap opens correctly. Home Depot recommends a short test cycle after reassembly, and This Old House suggests checking airflow at the outside vent with your hand.
When it makes sense to call a professional
DIY cleaning is reasonable for many first-floor, short-run vent systems. But some situations are better handed to a qualified professional. Very long or complex duct runs, roof terminations, hard-to-access installations, gas-dryer concerns, visible duct damage, years of neglected buildup, or persistent slow drying even after you clean. This Old House explicitly calls out long or complex vents, hard-to-reach runs, severe clogging, and discomfort with gas appliances as reasons to bring in expert help.
Professional service also makes sense when the issue is not just lint. Blocked terminations, crushed transition ducts, improper materials, and bird or pest nests can turn a “cleaning” problem into a repair or code-correction problem. In those cases, the best result comes from solving airflow, not just removing debris.
Habits that keep your dryer vent cleaner longer
The easiest way to avoid heavy buildup is to treat dryer safety as a routine, not a once-a-year panic project. Clean the lint screen every load. Keep the area around the dryer free of lint and clutter. Make sure the outdoor flap opens when the dryer is running. Use metal venting wherever possible, and avoid letting excess slack or bends develop behind the machine. NFPA also advises turning the dryer off if you leave home or go to bed, which is a small habit that meaningfully reduces the chance of an unattended problem escalating. What causes a clogged dryer vent
A clean, well-routed dryer vent does more than support safety. It helps the dryer work the way it was designed to work. Faster airflow, shorter cycle times, less trapped moisture, and less unnecessary wear on the appliance. For homeowners, that is the real win. Dryer vent cleaning is not glamorous, but it is one of the highest-value maintenance tasks in the laundry room.
Spring cleaning refreshes your home, and it also helps you prevent problems before warm weather arrives. Use this 2026 checklist to clean smarter, protect your family, and keep your dryer running efficiently.
Home maintenance for new homeowners: If you recently moved to Illinois, start here. First, handle airflow and safety items (like clothes dryer vents). Then, work through the rest of the list one room at a time.
Spring Cleaning and Clothes Dryer Vents
Quick win
Start with your laundry room. First, empty the lint trap. Next, schedule a professional dryer vent cleaning if you haven’t done one in the last year.
2026 weather snapshot: Punxsutawney Phil vs. the National Weather Service
Some years, spring shows up early. Other years, winter hangs on in Illinois. Either way, spring cleaning still pays off, because indoor air, moisture, and lint don’t wait for a forecast.
Punxsutawney Phil’s report (2026): Phil saw his shadow on February 2, 2026, so he predicted six more weeks of winter. See the official record.
National Weather Service (data-driven outlooks): NOAA’s Climate Prediction Center publishes monthly 90-day outlooks for temperature and precipitation, and local NWS offices publish regional spring flood outlooks. View CPC outlooks and see the Chicago NWS spring flood outlook.
Bottom line: Phil gives us a fun tradition. However, the National Weather Service uses measured data and models. So, plan for changing temps, and knock out safety tasks (like dryer vent cleaning) right away.
Why dryer vent cleaning belongs on your spring list
When lint builds up, your dryer works harder. As a result, loads take longer and energy costs rise. More importantly, lint can ignite. The U.S. Fire Administration has reported thousands of residential clothes dryer fires per year in past analyses, and it also warns that skipping cleaning increases risk. USFA fire cause reports and USFA dryer fire safety tips.
So, if you only do one “maintenance” task this spring, start with your clothes dryer vents. Then, build the rest of your spring cleaning around it.
10-point spring cleaning checklist (with clothes dryer vent focus)
This checklist keeps every task clear and doable. First, follow the steps in order. Then, repeat the high-value safety checks each season.
Declutter and organize
Start simple, because clutter slows everything down.
Remove unused or unwanted items.
Sort items into four groups: keep, donate, recycle, or discard.
Add easy storage like shelves, bins, and baskets.
Also, keep a small “donate box” going year-round. That way, next spring feels easier.
Deep clean every room
Next, break the work into rooms so you don’t feel overwhelmed.
Kitchen: Clean appliances, sanitize counters, wipe cabinets, and mop floors.
Bathroom: Scrub tiles, grout, toilets, sinks, and showers. Then replace shower curtains or liners if needed.
Living room and bedrooms: Vacuum carpets, dust surfaces, wash curtains and linens, and clean windows.
Consequently, you’ll see progress faster, and you’ll stay motivated.
Check and maintain HVAC systems
Then, move to airflow. Clean air helps your whole home feel better.
Replace air filters to improve indoor air quality.
Schedule professional servicing and duct cleaning to help systems run efficiently.
Clear debris around outdoor HVAC units, and trim nearby plants.
As a result, your HVAC works less, and you avoid surprise repairs.
Inspect plumbing and water fixtures
After that, watch for small leaks. They can turn into big damage.
Check under sinks and around appliances for leaks.
Inspect faucets, showerheads, and toilets for drips or odd noises.
Clear slow drains with safe cleaners, or use vinegar and baking soda.
Therefore, you protect floors, cabinets, and walls before problems spread.
Clean clothes dryer vents
Now tackle the big one. Lint builds up all year, so spring is the perfect reset.
Clean the lint filter after every use.
Vacuum visible lint around the dryer, behind it, and under it.
Check the outside vent hood for a flap that opens freely during a cycle.
Schedule professional dryer vent cleaning annually to remove hidden, hazardous buildup.
Moreover, a clean vent shortens dry times. So, you save energy while improving safety.
Outdoor maintenance
Once the inside feels fresh, step outside. Curb appeal also protects your home.
Clean gutters and downspouts to prevent water buildup.
Inspect your roof and siding for damage or wear.
Power wash driveways, patios, decks, and exterior walls.
Additionally, steady outdoor care helps your property value.
Safety checks
Next, double-check the basics. These steps only take minutes.
Test smoke and carbon monoxide detectors, and replace batteries as needed.
Inspect fire extinguishers, and replace expired units.
Confirm that all doors and windows lock properly.
Consequently, you gain peace of mind day and night.
Lawn and garden prep
Then, set up your yard for growth. Spring rewards small effort.
Aerate and fertilize your lawn.
Prune trees and bushes, and remove dead branches.
Plan and plant garden beds and containers.
As a bonus, healthy landscaping boosts your home’s look.
Do a “laundry room reset” (fast, but powerful)
Finally, finish where lint loves to hide.
Wipe the dryer drum seal and door area with a damp cloth.
Confirm your vent hose isn’t crushed, kinked, or made of flimsy foil-style duct.
Check for birds’ nests or blockages at the outside vent opening.
Run one load and listen. If the dryer strains, stop and inspect airflow.
Meanwhile, if you smell a musty odor, moisture may be stuck in the vent line.
Schedule the pros (so you don’t have to guess)
Even with great DIY habits, some systems need tools and experience.
Book a professional dryer vent inspection and cleaning at least once per year.
Schedule HVAC servicing before summer heat hits Illinois.
Call for plumbing help if you see repeat leaks or slow drains.
In other words, you prevent emergencies by planning ahead.
Ready to cross “dryer vent cleaning” off your list?
Serving Illinois homeowners. Call (847) 874-4805 or use the quick booking form: https://thelintking.as.me/.
Note: If your dryer takes longer than normal, feels hotter than usual, or shuts off mid-cycle, restricted airflow may be the reason. So, treat those signs as a prompt to schedule service.
Wrap-up: keep the momentum going
When you tackle these tasks one by one, you improve your home’s look, function, and lifespan. Happy spring cleaning and home maintenance!
If you prefer video, you can also watch this short clip from The Lint King:
FAQ: spring cleaning and clothes dryer vents
How often should I clean my dryer vent?
Most homes benefit from professional cleaning once per year. However, large families, pets, and long vent runs often need more frequent service.
What’s the easiest sign of a clogged vent?
Long dry times usually show up first. Also, check the outside vent hood. If the flap barely opens during a cycle, airflow is likely restricted.
Should I DIY the whole vent line?
You can clean the lint filter and vacuum around the dryer. Still, long runs, roof vents, tight bends, and hidden ducts often require professional tools to clean safely.
The Lint King • Dryer Vent Cleaning Experts • Illinois, USA
Hey, fellow homeowners—it’s November 29, 2025, and that crisp air has you cranking up the dryer like it’s auditioning for the holidays. Cozy sweaters? Check. Festive flannels? Double check. But hold up: while you’re battling the chill, lint is plotting its revenge. One clogged vent, and poof—your laundry day becomes a literal hot mess. Shocking stat alert: Nearly 40% of dryer fires rage from November to February, spiking risks when you need warmth most. Yikes, right? Enter The Lint King Dryer Vent Cleaning Experts—your local heroes swooping in to banish lint buildup, slash fire risks, and keep your energy bills from snowballing. We’re not just cleaners; we’re fire-fighters in flannel. In this no-BS guide, we’ll unpack the scary stats, drop game-changing prevention tips, spotlight heart-wrenching real-life stories hitting close to home, and show why pro service beats DIY every time. Grab a mug of hot cocoa (safely brewed, of course), and let’s dive in. Your home—and sanity—will thank you.The Chilling Truth: Why Winter Makes Dryers a Ticking Time BombPicture this: Snowflakes swirling outside, but inside, your dryer’s humming overtime on those damp winter loads. Sounds idyllic? Not when lint clogs turn it into a fire hazard. The National Fire Protection Association (NFPA) drops a bombshell: Dryers spark about 13,820 home fires yearly in the U.S., racking up 344 injuries, 7 deaths, and a whopping $233 million in damages. And guess when the chaos peaks? Right now—nearly 40% hit between November and February, thanks to marathon laundry sessions and moist clothes fostering epic clogs.Why the winter woe? Colder temps mean longer dry times, piling up flammable lint like a bad habit. Electric dryers? They’re 2.5 times riskier than gas ones, blasting heat that trapped gunk loves to ignite. Fires often erupt midday to evening—prime time for post-work loads—starting right in the machine and spreading like wildfire through vents. One in every 15 homes faces this threat annually. Scary? Absolutely. But here’s the thrill: You can flip the script with smart moves.Quick Stat Breakdown: The Numbers That’ll Wake You Up
Stat
Jaw-Dropper
Why It Hits Home
Annual Dryer Fires
13,820
That’s 38 blazes a day—mostly lint-fueled.
Winter Share (Nov-Feb)
40%
Holiday hustle + wet wool = danger zone.
Top Cause
32% from uncleaned vents
Skip cleaning? You’re rolling the dice.
Damage Toll
$233M yearly
One fire could torch your holiday budget.
These aren’t dusty reports—they’re wake-up calls. As local pros, we’ve seen [Your City] families dodge disasters post-cleaning. Ready to join them?Heartbreaking Hits Close to Home: Real 2025 Dryer Fire StoriesStats are one thing, but nothing drives it home like stories from folks just like you—neighbors turned refugees by a sneaky lint spark. These fresh 2025 cases from across the U.S. (including spots not far from [Your City]) remind us: It could happen tomorrow. We’ve pulled the latest local news to spotlight why venting matters now.
Arlington, FL Heartbreaker (Nov 2025): An entire family lost everything in a raging dryer blaze that gutted their home just before Thanksgiving. “We’ve lost everything,” the mom shared, sifting through ashes of holiday gifts and memories. Quick-thinking neighbors called 911, but the fire spread fast via clogged vents— a brutal wake-up for holiday preppers.
Dumfries, VA Displacement Drama (Nov 2025): Five souls, including kids, fled their rental after dryer vent buildup ignited like dry tinder. Flames licked the walls before firefighters contained it, leaving $50K+ in smoke damage and a frantic search for temp digs. “We thought it was just lint,” one resident said—until it wasn’t.
St. Charles, IL Apartment Avalanche (Nov 2025): A single dryer malfunction torched two units, displacing four families and racking up $60K in damages. Smoke poured through shared vents, turning a quiet Thursday into chaos. Fire crews praised the building’s alarms but warned: “Lint doesn’t discriminate—clean or combust.”
Peoria, IL Close Call (Nov 2025): No injuries, but a basement dryer fire singed a family’s holiday setup, contained only by speedy pros. The cause? Classic lint overload from fall laundry surges. “Lucky it didn’t spread,” the fire chief noted—echoing calls for vent checks before winter bites.
These aren’t far-off tales—they’re flashing lights in backyards nationwide, proving 32% of fires stem from ignored vents. In [Your City], we’re hearing echoes; don’t let your story be next. The Lint King turns “what if” into “we got this.”Fire-Proof Your Fortress: Killer Prevention Tips Straight from the ProsEnough doom-scrolling—let’s get actionable! The Lint King team lives by NFPA and U.S. Fire Administration (USFA) wisdom, turning “what if” into “no way.” Start small, stay consistent, and watch your dryer hum happily. Pro tip: These hacks could prevent 31% of fires tied to dirty dryers. Boom.Daily Power Plays: 60 Seconds to SafetyYou load up, hit start—now add these zippy rituals to crush lint before it conspires.
Scour that lint trap like your life depends on it: Every. Single. Load. Scrape, scrub with soapy water if needed. Boom—better airflow, zero fire fuel.
Ditch the overload drama: Keep it ¾ full max. Cramming? It traps heat and lint like a villain’s lair.
Eyes on the prize: Never ghost your dryer. Unattended runs spark 3% of fires—set a timer and chill nearby.
Oil-stained foes? Air-dry first: Gas, paint, or grease on fabrics? Wash twice, then sunbathe ’em. Dryers + residues = recipe for regret.
Feel the rush? These tweaks slash risks instantly. As a result, your wallet stays fat on energy savings too.Monthly Deep Dives: Hunt Down Hidden HiccupsWinter’s sneaky—moisture breeds mold in vents. Patrol like a boss to stay ahead.
Vacuum the VIP zones: Back of the dryer, floor, drum—suck up dust bunnies with a crevice tool. Skip the filter slot, though.
Poke the hoses: Unplug, then check for crimps or wobbles. Tighten ’em up—no sparks allowed.
Outdoor vent vibe check: Fire it up and dash outside. Strong whoosh of hot air? Golden. Weak puff? Clog alert—act fast!
Flap patrol post-storm: Snow, leaves, bird nests? Evict ’em. Slap on a bird guard for long-term lockdown.
Spot red flags like marathon dry times (>45 mins), funky smells, or scorching exteriors? Unplug and summon reinforcements. Your gut’s got the goods.Warning Signs Cheat Sheet: Don’t Ignore These Alarms
Red Flag
The Drama
Hero Move
Dries slower than molasses
Lint logjam starving airflow
Vent inspection stat!
Smells like a BBQ gone wrong
Overheat city
Unplug, call pros.
No outdoor exhaust party
Total blockage bash
Deep clean incoming.
Rattles like a maraca
Strain from clogs
Level it and vent-check.
Annual All-Star Upgrades: Go Pro for Epic WinsDIY brushes? Cute, but they miss the deep dark. Twice-yearly pro cleans zap 32% of vent fires—don’t sleep on it.
Book the big guns: We snake 10+ feet, yanking 99% of gunk with beast-mode tools.
Duct detox: Ditch flimsy foil for rigid metal (4-inch wide). Flexy stuff sags and hoards lint like a dragon.
Electric smarts: Dedicated outlet only—no daisy-chaining. Gas peeps, leak-test yearly.
Bonus: Clean vents turbo-charge efficiency, trimming cycles by half and bills by 30%. High-five to that!Setup Superstars: Nail It from Day OneSloppy installs fuel 15% of infernos—build bulletproof.
Space it out: 18 inches clear around—no cramming in closets sans exhaust.
Bend minimally: Straight shots under 25 feet, max 90° turns. Resistance? Fire’s bestie.
Alarm squad: Smoke/CO detectors in laundry land—test monthly.
Squad briefing: Rally the fam on rules. Sticky-note reminders? Genius.
For renters or high-rises, grill your super on codes—no indoor loops!Why The Lint King Rules Your Local SceneWe’re not faceless nationals—we’re [Your City] lint slayers, topping “dryer vent cleaning near me” searches with 5-star swagger. Punctual vans, green gear, and zero-mess magic? That’s us. Customers rave: “Saved my holidays—and my house!” Plus, our seasonal steal: 20% off bookings by December 15. Why wait?[Insert Graphic Here: A punchy infographic in fiery reds and cool blues. Left: Nightmare clogged vent spewing lint-fire icons. Right: Gleaming clean setup with thumbs-up for safety, speed, and savings. Slap on our logo and zinger: “Lint’s Out—Winter’s In! Book The Lint King Today.” Make it shareable AF.]Ignite Your Safety Spark: Book Now and ChillWhew—that was a whirlwind, but you’re armed and awesome now. These stats, stories, and tips aren’t just words; they’re your shield against 15,000+ annual dryer dramas. Fire up that peace of mind—call The Lint King at [Phone Number] or hit [Website] for a free inspect. Hundreds of locals already sleep sounder. What’s your move? Drop a comment: What’s your wildest dryer story? Let’s chat safety over coffee (virtually, obvs). Stay toasty, stay safe—winter’s waiting!
The winter holidays bring joy with twinkling lights, family gatherings, delicious meals, and… a surprising spike in home laundry loads from guest towels, cozy sweaters, and festive linens. That’s exactly why dryer vent cleaning deserves a spot on your holiday prep checklist, right up there with decorating the tree.
Why It’s Crucial During Winter
Higher dryer usage: Cold weather means bulkier clothes (think blankets, jackets, and hoodies) that produce more lint. Plus, with house guests, you’re running more loads—perfect conditions for lint buildup.
Peak fire risk season: Clothes dryers cause thousands of home fires annually in the US, and incidents peak in winter months (especially January). The leading cause? Failure to clean vents, where flammable lint accumulates and can ignite.
Efficiency and safety boost: A clogged vent forces your dryer to work harder, leading to longer drying times, higher energy bills, musty odors, and even potential mold from trapped moisture in cold weather.
Cleaning your dryer vent now prevents hazards while keeping your home running smoothly for holiday hosting.
While you’re busy baking cookies and wrapping gifts, it’s important to ensure your home stays safe and warm. One key step is making sure your dryer vent is clean and clear.
In fact, a clean dryer vent can protect your family from fire hazards and inefficiency during the holiday season. To help you check this off your to-do list, The Lint King – Dryer Vent Cleaning Experts is offering a special $15 off discount on professional dryer vent cleaning services this month. This limited-time holiday offer means now is the perfect time to give your home the gift of safety and save money in the process.
Why Dryer Vent Cleaning Is a Holiday Essential
Home safety during the holidays is paramount
We often string lights and light candles during the winter holidays. However, many overlook a hidden fire risk: a clogged clothes dryer vent.
Did you know? Lint buildup causes thousands of home dryer fires each year in the U.S. Moreover, these fires peak in fall and winter. For example, January is often the highest month due to more frequent dryer use with heavier clothes.
In addition, overall home fires spike in December from holidays, cooking, and decorations (per NFPA data).
Therefore, preventive steps are essential now.Finally, a vent packed with lint acts like a ticking time bomb. Consequently, even a small spark can ignite a fast-spreading fire.
Winter conditions add to the hazard
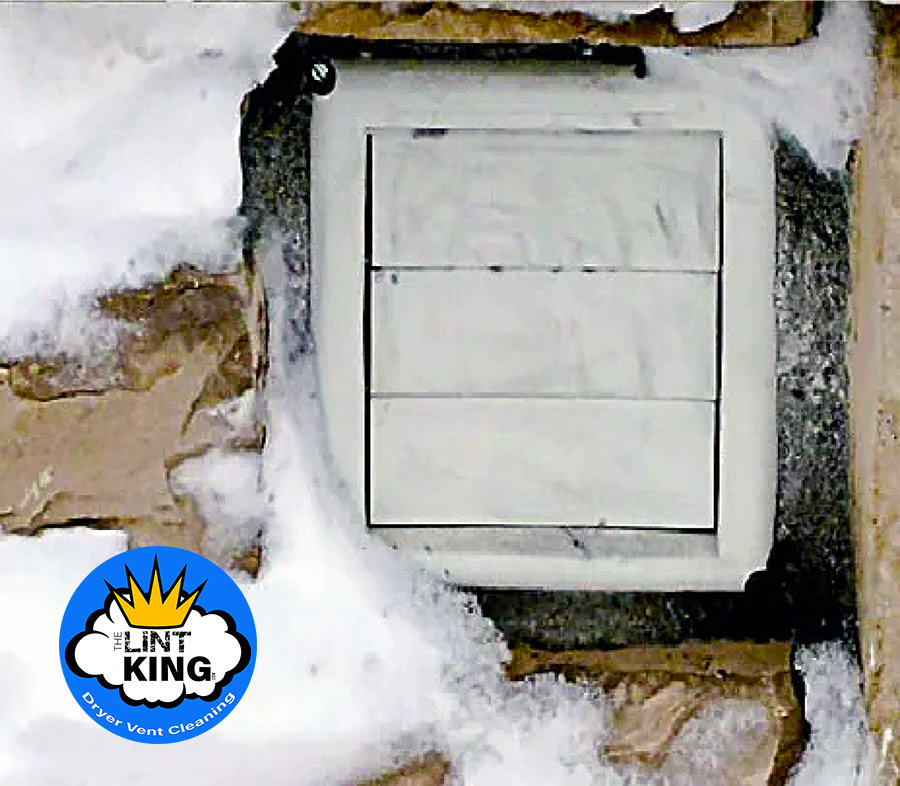
Frozen Dryer Vents. Dryer Vent Cleaning
A white Christmas looks beautiful. However, snow and ice can block your dryer’s outside vent. When the exterior vent is obstructed, moist air cannot escape properly. As a result, the vent line may freeze or back up with lint. This blockage forces your dryer to work harder. Moreover, it can cause overheating.
In addition, for gas dryers, it risks carbon monoxide buildup inside your home. No one wants a preventable accident during holiday gatherings. Therefore, check and clear your dryer vent before deep winter arrives.
Finally, this simple step keeps your home safer all season long.
Heavier holiday laundry creates more lint
Think of all the cozy sweaters, fluffy blankets, and guest bedding you tend to wash and dry during the holiday season. Thicker fabrics produce more lint with each cycle. If your vent hasn’t been cleaned recently, that excess lint has nowhere to go – except to clog up your vent duct. As a result (and as many homeowners discover too late), clogged vents lead to longer drying times, higher energy bills, and a greater fire risk. This is why experts recommend cleaning your dryer vent at least once a year, and especially before the holidays. By being proactive now, you’re not only preventing potential hazards but also setting yourself up for a calm and joyful holiday season with one less worry on your plate.
Benefits of a Clean Dryer Vent This Winter
Getting a professional dryer vent cleaning done ahead of the Christmas season offers plenty of immediate and long-term benefits for homeowners. Here are some of the top advantages, beyond just fire prevention, that you can enjoy with a lint-free vent:
Reduced Fire Risk: Lint is extremely flammable. Removing the built-up lint and debris in your vent drastically lowers the chance of a dryer-related fire. You’ll feel safer knowing you’ve eliminated the number one cause of dryer fires (failure to clean the vent) from your home. content.nfpa.org
Improved Dryer Efficiency: With an open, unobstructed vent, your dryer can “breathe” and exhaust hot, moist air properly. Clothes dry faster and more evenly when the vent line is clear. No more running extra cycles for a single load – a clean vent helps each load dry on the first go, even those heavy jeans and towels. This means less waiting around for laundry and more time enjoying eggnog by the fire.
Lower Energy Bills: When your dryer runs efficiently, it uses less electricity or gas per load. In fact, a blocked vent can make drying a load take twice as long (using twice the energy). By restoring proper airflow, you’ll save on utility costs because your dryer doesn’t have to work overtime. Some customers even notice a drop in their energy bills after a vent cleaning. (One happy homeowner reported, “my gas bill dropped by $35 in the month after The Lint King cleaned our vent – the service paid for itself!”) thelintking.com
Longer Dryer Lifespan: If your dryer is constantly overheating or running extra cycles due to a clogged vent, it experiences more wear and tear. Cleaning out the vent reduces strain on the appliance’s motor and heating element. The result? Your dryer will likely last longer and need fewer repairs, saving you money on costly appliance fixes or replacements. It’s like giving your dryer a well-deserved fresh start.
Healthier Indoor Air Quality: A clogged vent keeps humid air and lint dust trapped in your laundry area. Over time, this can lead to musty odors, or even mold and mildew in extreme cases. In winter when we keep windows closed, indoor air quality matters. By clearing the dryer duct, you prevent excess lint dust and humidity from circulating in your home, so your indoor air stays fresher and cleaner.
Prevent Carbon Monoxide Buildup: If you have a gas dryer, a blocked vent not only increases fire risk but also the danger of carbon monoxide (CO) backing up into your house. CO is an odorless gas that can be very harmful. A clean vent ensures exhaust gases are properly channeled outside. This gives you peace of mind that your family is safe from both fire and carbon monoxide hazards while the dryer is running.
Signs You Need Dryer Vent Cleaning Before Santa Arrives
How do you know if your dryer vent is clogged heading into the holiday season? Keep an eye out for these warning signs and address them before your relatives arrive and the laundry loads multiply:
Clothes take forever to dry: If a normal load that used to dry in 45 minutes now needs two or more cycles, your vent could be packed with lint. Extended drying time is often the first red flag of a vent obstruction.
Laundry room feels like a sauna: Excessive heat or humidity buildup when the dryer is running indicates the hot air isn’t escaping through the vent as it should. The room might even feel damp or notice a musty smell – a clogged vent could be to blame.
Burning smell or lint around the dryer: A slightly smoky or burning lint smell while drying is a serious warning sign. Also, check behind the dryer and at the vent outlet; if you see lint accumulating around the hose or outside vent flap, it means lint is not making it out of the system.
Dryer warns you or shuts off: Many newer dryers will sense overheating and automatically shut down for safety. If your dryer is frequently stopping, displaying a warning light, or the top of the machine feels very hot to touch, cut the power and get the vent inspected. Don’t risk running it again until the vent is cleaned.
It’s been more than a year: Can’t remember the last time you had a proper dryer vent cleaning? Then it’s definitely time. Experts recommend a yearly cleaning (or more often if you do very frequent laundry) to prevent issues. If you’ve never had it done, doing it now will make a huge difference in safety and performance.
If you’re noticing any of these issues, don’t wait. Addressing them now will ensure your dryer is running safely and efficiently when you really need it – such as washing all those holiday linens and ugly Christmas sweaters!
Warm Testimonials from Our Satisfied Customers
At The Lint King, nothing makes us happier than hearing how our service has helped families stay safe and stress-free, especially during the holidays. Here are a few heartwarming testimonials from homeowners we’ve helped with dryer vent cleaning:
“We just bought our first home and had no clue our dryer wasn’t running properly until The Lint King came out. I’m glad we called – it may have saved our lives!” – Andrew J., Bartlett, ILthelintking.com
“Great work, and my dryer now works twice as fast. Thank you for making my laundry room safe and saving me hours each day!” – Caroline P., Palatine, IL
“Best service I ever received, and my gas bill dropped $35 after my dryer vent cleaning! The professional, fast service paid for itself within just a few months.” – Angela P., Hoffman Estates, IL
These are just a few of the many positive remarks we’ve received. We’re proud to be Northern Illinois’s trusted dryer vent cleaning experts, and stories like these inspire us to keep delivering top-notch service. Our customers notice the difference right away – from faster drying clothes to the peace of mind that their home is protected from a dryer fire.
(Testimonials like the above reflect our clients’ real experiences, and your results can be just as impressive. We strive for the same level of satisfaction for every homeowner we serve.)
Don’t Miss Our Holiday Special – $15 Off Dryer Vent Cleaning
In the spirit of the season, The Lint King is offering a limited-time holiday discount: $15 off your next dryer vent cleaning service. This special offer is our way of saying thank you to the community and helping you prioritize safety this Christmas. Act now, because this deal won’t last long – the discount is available for a short time only (through the end of December).
To claim your $15 off, simply print our coupon or mention this blog post when you schedule your service. We want to make it as easy as possible for you to get this important chore done before the festivities kick into high gear. By taking advantage of this offer, you’ll save money and gain peace of mind knowing your dryer is in tip-top shape. It’s a win-win holiday deal for you and your family’s safety.
Schedule Your Dryer Vent Cleaning Before the Holidays
Spending a little time on home maintenance now can save you from major problems later. Scheduling a dryer vent cleaning with The Lint King is straightforward and convenient. Our friendly technicians will work with your busy holiday schedule – we even offer flexible appointment times with a +/- 15 minute arrival window to accommodate you. You can book your dryer vent cleaning online or give us a call to set up an appointment. We recommend booking soon, as many homeowners are rushing to get their vents serviced before family visits and holiday celebrations.
Once you’ve booked, we handle the rest. On the day of your appointment, our trained technician will arrive promptly (in a clearly marked The Lint King vehicle, of course!). We’ll perform a thorough cleaning of your entire dryer vent system – from the back of the dryer all the way through the ductwork to the outside vent cap. We use professional tools to remove every bit of lint, debris, or even the occasional bird’s nest. Your dryer vent will be clean as a whistle when we’re done, improving your dryer’s performance immediately. And don’t worry – we always clean up after ourselves, leaving your laundry area just as neat as we found it.
Enjoy a safe and cozy holiday home. By having your dryer vent cleaned now, you can kick back with a mug of hot cocoa knowing you’ve significantly reduced the fire risk in your house. Your dryer will run more efficiently, your guests’ bedding and towels will be ready in a jiffy, and you might even notice those energy bills going down. Most importantly, you’ll have the peace of mind that your home is safer for all the festivities to come.
Give Your Family the Gift of Safety This Christmas
The holidays should be a time of warmth, joy, and peace – not worry over potential household hazards. A simple dryer vent cleaning can make a world of difference in home safety. It’s one of those small gifts to yourself that pays off immediately. So as you deck the halls and prepare for Santa’s arrival, make sure your home is ready as well.
Take advantage of our $15 off holiday special and schedule your dryer vent cleaning today. Your future self (and your family) will thank you when laundry day is trouble-free and safe. From our family at The Lint King to yours, we wish you a happy, healthy, and safe holiday season. Stay warm, stay safe, and enjoy the festivities with the confidence that your dryer is one thing you won’t have to worry about this Christmas!
Happy Holidays and thank you for letting The Lint King help keep your home safe and cozy! 🎄👑
A Definitive Report on Clothes Dryer Vent Safety and Maintenance
The act of doing laundry doesn’t seem like a hazard guardian of your home is one needed, but of the most routine and mundane chores in modern life. Yet, within this cycle of washing and drying lies a significant and frequently underestimated hazard. The clothes dryer, an appliance found in the vast majority of homes, operates on a simple principle of tumbling clothes in heated air.
A byproduct of this process is lint—tiny fibers shed from fabrics. While most homeowners are diligent about cleaning the visible lint trap, a dangerous misconception persists that this single action is sufficient to ensure safety. It is not. The reality is that a substantial portion of this lint bypasses the trap and enters the dryer’s exhaust vent, where it can accumulate over time, creating the perfect conditions for a devastating fire.
The combustibility of dryer lint is not a trivial matter. It is so effective as tinder that organizations like the Boy Scouts have historically used it as a reliable fire starter. When this highly flammable material builds up within the enclosed space of a dryer vent, it is subjected to a constant flow of hot air, baking it into a dry, dense fuel source.
The U.S. Fire Administration and the US Consumer Products Safety Commission have identified clogged dryer vents as a leading cause of residential fires, responsible for an estimated 16,500 incidents annually. These are not minor flare-ups; they are serious events that can lead to catastrophic property loss, injury, and death.
The Unseen Hazard of Your Home
The pervasiveness of this risk is compounded by a general lack of awareness. Because the dryer is such a familiar appliance, a sense of complacency has developed, masking its potential as a serious threat. This is evidenced by the experiences of countless homeowners who, upon having their vents professionally cleaned for the first time, express shock and surprise.
Testimonials often include statements like, “We just bought a new dryer and had no clue about the dryer vent needing to be cleaned… I had no idea how much lint and hair was in my dryer vent”. This knowledge gap highlights a critical vulnerability in home safety protocols. The core issue is not merely the physical accumulation of lint, but a widespread educational deficit that normalizes a preventable risk.
This report serves as a definitive guide for homeowners, designed to bridge that educational gap. It will dissect the anatomy of a dryer vent clog, detail the full spectrum of associated risks—from fire and toxic gas exposure to financial waste—provide a clear framework for diagnosing a problem, and outline a comprehensive strategy for mitigation and long-term prevention. The objective is to transform the perception of dryer vent cleaning from an overlooked chore into a critical, non-negotiable home safety protocol, on par with testing smoke detectors and maintaining heating systems.
Section 1: The Anatomy of a Clog: Why Your Dryer Vent is a Ticking Time Bomb
Understanding the danger posed by a clothes dryer begins with understanding the fundamental limitations of its design and the specific characteristics of modern homes that exacerbate the issue. The accumulation of lint is not a sign of a faulty appliance; it is an inherent consequence of its normal operation. The danger arises when this accumulation goes unmanaged in a vent system ill-equipped to handle it.
1.1 The 75% Problem: The Inherent Flaw in Lint Traps
Every time a clothes dryer runs, its internal blower fan expels a high-velocity stream of hot, moist air to the outdoors. This exhaust air carries with it the lint, hair, pet fur, and fine paper or tissue debris shed from the laundry load. The primary line of defense against this debris is the lint trap or screen, a component every user is familiar with. However, this trap is only a partial solution.
Industry analysis
shows that the typical lint trap, even when cleaned after every use, captures only about 75% of the total particulate matter generated during a drying cycle. The remaining 25% is small enough to pass through the screen and is blown directly into the dryer’s exhaust vent system.
Over hundreds of drying cycles, this steady stream of highly flammable debris builds up inside the ductwork. It clings to the walls of the vent, especially at bends and turns, and slowly constricts the airway, setting the stage for a host of problems.
1.2 The Modern Home’s Compounding Factor
This “25% problem” has become significantly more acute due to trends in modern home architecture. In older homes, laundry areas were often located in basements or on exterior walls, allowing for a short, straight vent path directly to the outside. This configuration is ideal for safety and efficiency. However, for homeowner convenience, contemporary home design frequently positions laundry rooms in more central locations, such as on upper floors or in interior hallways.
This architectural choice has a direct and detrimental impact on dryer vent safety. A central location necessitates a much longer and more complex vent path to reach an exterior wall or the roof. These extended ductwork runs often involve multiple 90-degree bends and turns to navigate around structural elements within walls and ceilings.
Each of these bends acts as a bottleneck, slowing the velocity of the exhaust air and creating a point where lint is more likely to settle and accumulate.
Bends acts as a bottleneck
This increased airflow resistance, known as back pressure, not only chokes the vent over time but also significantly reduces the dryer’s operating efficiency from the moment it is installed. The very design of many modern homes, therefore, creates an environment that is intrinsically more susceptible to the formation of dangerous dryer vent clogs, a hidden systemic flaw that most homeowners are completely unaware of.
1.3 The Perfect Fuel: Understanding Lint’s Combustibility
It is crucial to understand that the material accumulating in the vent is not benign household dust. It is a potent fuel. Dryer lint is composed of fine, interwoven fibers of cotton, polyester, and other materials, along with hair and fur. This composition creates a high surface-area-to-mass ratio, which is a key characteristic of materials that ignite easily.
As this lint accumulates inside the duct, it is subjected to a continuous flow of hot air with every drying cycle. This process effectively bakes the lint, driving out any residual moisture and turning it into a tinder-dry mass. The longer it remains in the vent, the more compacted and combustible it becomes. This buildup of a perfectly prepared fuel source, located directly in the path of the dryer’s heating element exhaust, creates an exceptionally hazardous situation waiting for a single trigger—excessive heat—to cause ignition.
Section 2: A Cascade of Consequences: The Full Spectrum of Dryer Vent Risks
A clogged dryer vent is the root cause of a systemic failure within the home, triggering a cascade of consequences that range from guaranteed financial loss to life-threatening emergencies. These risks are not independent possibilities; they are interconnected, with the initial, more benign symptoms often serving as direct precursors to catastrophic events. Recognizing this chain reaction is essential for understanding the urgency of proper maintenance.
2.1 The Specter of Fire: From Overheating to Ignition
The most severe risk associated with a clogged dryer vent is fire. The sequence of events leading to ignition is a predictable outcome of restricted airflow. As lint builds up and narrows the duct, the flow of hot, moist air is impeded. This trapped heat causes the temperature inside the dryer drum and the exhaust system to rise dramatically.
Appliances are equipped with a high-limit thermostat as a safety feature to prevent overheating. When it senses an unsafe temperature, it shuts off the heating element. In a dryer with a clogged vent, this thermostat will cycle on and off frequently. This constant cycling puts excessive stress on the component, causing it to eventually fail. Once the high-limit thermostat fails, there is nothing to stop the dryer from reaching runaway temperatures. This extreme heat can easily raise the temperature of the tinder-dry lint accumulated in the vent to its ignition point, starting a fire that can spread rapidly through the hidden spaces of a home’s walls and floors.
This danger is amplified by user habits. A critical safety warning is to never leave a clothes dryer running when leaving the house or going to bed. The majority of clothes dryer fires occur after midnight, a time when occupants are asleep and least likely to detect the early signs of a fire, such as a burning smell, until it is too late.
2.2 The Silent Threat: Carbon Monoxide Poisoning
For homes with gas-powered dryers, a clogged vent poses an additional, insidious threat: carbon monoxide (CO) poisoning. Gas dryers produce carbon monoxide as a natural byproduct of combustion. Under normal operating conditions, this colorless, odorless, and lethal gas is safely vented to the outdoors along with the heat and lint.
When the vent is blocked, however, this deadly gas has nowhere to go. It backs up through the vent system and is forced back into the laundry room and, subsequently, into the living spaces of the home. This risk is particularly acute during winter months when the exterior vent opening can become completely sealed by snow and ice, creating a total blockage. This obstruction traps not only lint but also the toxic exhaust fumes, leading to a rapid and dangerous buildup of CO inside the house.
The symptoms of carbon monoxide poisoning—including persistent headaches, dizziness, nausea, and confusion—can be mistaken for other illnesses, delaying proper diagnosis and response. Prolonged exposure can lead to severe long-term health complications or fatal outcomes. The installation and regular testing of carbon monoxide detectors is a critical safety measure for all homes, but it is especially vital for those with any gas-powered appliances, including clothes dryers.
2.3 The Slow Burn: Compounding Financial and Material Costs
Long before a clog reaches the point of causing a fire or a CO leak, it begins to inflict a guaranteed financial toll on the household. This “slow burn” manifests in several ways, all stemming directly from the inefficiency caused by restricted airflow.
Energy Inefficiency: A dryer with a clogged vent must work harder and run significantly longer to dry a load of clothes. This extended operation directly translates into wasted energy and higher utility bills. The inefficiency is tangible; some professional services even use a surcharge policy, such as an additional $10 for every extra hour of drying time, as a real-world metric for the cost of a clog.
Accelerated Appliance Wear: The constant strain and overheating from poor ventilation take a heavy toll on the dryer’s mechanical components. The motor, belts, and especially the heating element are forced to operate under excessive stress, leading to premature failure. This results in a cycle of costly repairs and can ultimately shorten the appliance’s functional lifespan, necessitating an early and expensive replacement.
Damage to Clothing: The same excessive heat that damages the dryer also damages its contents. High temperatures can degrade fabric fibers, causing clothes to shrink, fade, and wear out more quickly. This reduces the lifespan of expensive garments and textiles.
Poor Air Quality and Mold: A blocked vent traps not only heat but also moisture. This moisture-laden air can leak into the laundry area or the wall cavity behind the dryer. This damp, warm environment is an ideal breeding ground for mold and mildew, which can damage walls and flooring and release spores into the home’s air, negatively impacting indoor air quality and potentially causing respiratory issues.
This cascade of consequences demonstrates that a seemingly minor issue like longer drying times is, in fact, the first warning sign of a systemic failure. The financial drain, the mechanical strain, and the life-safety hazards are all symptoms of the same root cause: a clogged vent.
Section 3: Reading the Signs: A Homeowner’s Diagnostic Guide
Proactive maintenance begins with the ability to recognize the warning signs of a developing problem. A clothes dryer provides several clear indicators that its vent system is becoming clogged. Paying attention to these signs allows for intervention before a minor issue escalates into a dangerous or costly failure.
The 60-Minute Rule
The most reliable and quantitative benchmark for dryer performance is the drying time itself. An industry-wide standard suggests that if a normal, full load of clothing consistently takes 60 minutes or longer to dry completely, the vent system requires immediate inspection and cleaning. Homeowners who find themselves repeatedly using the “Timed Dry” setting because the automatic cycles leave clothes damp are likely experiencing the effects of a significant airflow restriction. This simple pass/fail test is the single most important diagnostic tool for any dryer owner.
Sensory Warnings
Beyond timing, a struggling dryer often provides qualitative warnings that can be detected through sight, touch, and smell.
Touch: A key indicator of trapped heat is an overheating appliance. If the exterior of the dryer cabinet—the top or sides—feels unusually or excessively hot to the touch during or immediately after a cycle, it is a sign of poor ventilation. Similarly, if the clothes themselves are much hotter than normal at the end of a cycle, it points to the same issue.
Smell: The presence of a distinct odor while the dryer is running is a clear red flag. A musty smell suggests that damp lint is accumulating and may be fostering mildew growth inside the vent. A sharp, burning smell is even more alarming, as it indicates that lint has built up near the dryer’s heating element and is scorching—a condition that can be a direct precursor to a fire.
Sight: Visual cues can also signal a problem. An unusual amount of lint left on “clean” clothes after drying is a sign that airflow is backing up. Likewise, if large amounts of lint are accumulating on the floor or wall behind the dryer, it suggests the vent system is clogged. It is also critical to perform a visual check of the exterior vent termination. If the protective flaps do not open when the dryer is running, or if they are visibly clogged with lint, debris, or in winter, snow and ice, it confirms a blockage at the end of the line.
Appliance Error Codes
Many modern clothes dryers are equipped with sophisticated sensors that monitor airflow. When these sensors detect a dangerous level of restriction in the vent system, they will trigger an error code on the appliance’s digital display. For example, on certain Whirlpool and Maytag models, codes such as AF (Air Flow) or F4 E3 specifically indicate that the lint screen or the vent is clogged and requires service. These codes should be treated as an urgent warning from the appliance itself that a hazardous condition exists.
Table 1: Diagnostic Checklist for a Clogged Dryer Vent
To assist homeowners in performing a structured self-assessment, the following table synthesizes the key warning signs of a clogged dryer vent. Checking for these indicators regularly can help identify problems early.
Symptom / Indicator
Detailed Description
What It Means (Underlying Problem)
Extended Drying Time
A single, normal load consistently takes longer than 60 minutes to dry. You find yourself using the “Timed Dry” setting repeatedly.
Severe airflow restriction. The dryer cannot efficiently expel moist air, leading to wasted energy and time.
Overheating Appliance
The exterior of the dryer (top or sides) is unusually hot to the touch during or after a cycle. Clothes feel excessively hot.
Trapped heat due to poor ventilation. This is a direct precursor to component failure and fire risk.
Burning or Musty Odor
You notice a distinct burning smell (from scorching lint) or a musty smell (from trapped, damp lint) while the dryer is operating.
Lint is accumulating near the heating element or moisture is trapped, fostering mildew. A clear red flag for fire or air quality issues.
Excessive Lint
You see more lint than usual on your “clean” clothes, or lint is collecting in large amounts behind or around the dryer.
The vent system is so clogged that air pressure is backing up, forcing lint into the laundry room and onto clothes instead of outside.
Exterior Vent Issues
The outside vent flap does not open when the dryer is running, or it is visibly clogged with lint, snow, or debris.
There is a blockage at the termination point, or airflow is too weak to open the flap, indicating a clog somewhere in the line.
Dryer Error Codes
The dryer’s display shows a specific code indicating an airflow or vent problem (e.g., AF, F4 E3).
The dryer’s internal sensors have detected a dangerous level of airflow restriction and are issuing a direct warning.
Section 4: The Path to Resolution: Evaluating Your Cleaning Options
Once a clogged vent has been diagnosed, the next step is to resolve the issue. Homeowners are faced with a choice: attempt a do-it-yourself (DIY) cleaning or hire a professional service. While the DIY approach may seem like a cost-saving measure, it is often incomplete, ineffective, and can even create new, hidden dangers. A professional service, by contrast, provides a comprehensive system purge and a critical safety inspection.
4.1 The DIY Dilemma: An Incomplete and Potentially Dangerous Approach
The primary challenge for a DIY cleaning is the inadequacy of consumer-grade tools and techniques. While cleaning kits with flexible brushes are widely available, they often lack the length and rigidity to navigate the long, complex vent runs found in many modern homes. This means that even a diligent homeowner may only clear the first few feet of the duct, leaving the majority of the clog—often located deep within walls or ceilings—untouched.
More concerning are the potential dangers of improper DIY methods. A particularly hazardous but commonly attempted technique is using a leaf blower to force air through the vent. The high pressure generated by a leaf blower (up to 105 MPH) can be strong enough to separate sections of ductwork that are joined with tape behind a wall. This creates a breach in the vent line. The homeowner, seeing some lint exit the exterior vent, may believe the job was successful. In reality, they have created a far more dangerous situation where hot, moist, lint-filled air is now being vented directly into the wall cavity or attic space, dramatically increasing the risk of a hidden fire and promoting mold growth.
Furthermore, a critical flaw in nearly all DIY cleanouts is their scope. Homeowners focus exclusively on the ductwork from the wall to the outside. However, a significant amount of lint builds up inside the dryer’s cabinet—under the drum, around the motor, and near the fan housing. This internal accumulation is often more of a fire hazard than the lint in the ductwork itself, as it is in closer proximity to the appliance’s heat source and electrical components. This area is inaccessible to most homeowners and is almost never addressed in a DIY cleaning.
4.2 The Professional Standard: A Comprehensive System Purge
The true value of hiring a professional service extends far beyond simply removing lint; it encompasses a complete diagnostic and safety audit of the entire dryer system. The goal of a professional is not just to achieve a clean pipe, but to ensure and verify a safe and efficient system from the appliance’s internal components to the exterior of the home.
The professional process is methodical and comprehensive. It typically includes the following steps:
Disconnection and Internal Cleaning: The service begins by carefully pulling out the dryer and disconnecting it. Technicians then access and clean the internal airways of the appliance itself, clearing lint from under the lint trap housing and up to the blower fan from the rear of the machine. This addresses the hidden internal fire hazard that DIY methods miss.
End-to-End Duct Cleaning: Using specialized equipment, professionals clean the entire length of the ductwork. The industry-standard method involves a combination of high-powered vacuums and rotating brushes. The vacuum creates strong negative pressure, pulling debris inward, while the rotary brush dislodges compacted lint from the walls of the duct. This “pull” method is fundamentally safer than the “push” method of a leaf blower, as it helps keep duct segments securely connected.
Exterior Vent Clearing: The service is completed from the outside by ensuring the exterior vent termination, whether it is a wall flap or a roof vent, is clean, clear, and functioning properly.
Inspection and Verification: Throughout the process, trained technicians inspect the entire system for issues beyond lint buildup. They can identify and flag hazardous materials like flammable plastic or foil ducting, spot crushed or disconnected pipes, and recognize poor installation practices. The service concludes with a functional test, measuring airflow and heat to verify that the system is now operating within safe and efficient parameters.
This diagnostic capability is the critical differentiator. A homeowner is not simply paying for labor; they are investing in expertise. The cost of a professional service, typically ranging from $89 to $189, should be viewed not as an expense, but as an investment in a comprehensive safety audit that provides verified performance and peace of mind.
Section 5: A Strategy for Proactive Prevention and Long-Term Safety
Effective dryer vent safety is not a one-time fix but an ongoing strategy. It is a holistic system that relies on the interplay of proper hardware, consistent user habits, and periodic professional maintenance. A failure in any one of these areas can compromise the safety of the entire system. Adopting a multi-layered approach is the only way to ensure lasting protection.
5.1 Establishing Your Cleaning Cadence
Determining the appropriate frequency for professional service is a key component of a long-term safety plan. The general, industry-wide recommendation and the safest baseline for most households is to schedule a professional inspection and cleaning annually. An annual service call ensures that lint accumulation is managed before it can become a significant hazard or impact efficiency.
However, this schedule can be tailored to a household’s specific usage patterns. The key factors influencing frequency are the volume of laundry, the presence of pets that shed, and the complexity of the vent system itself.
High-Usage Households: A large family, or any household that does frequent laundry and has multiple pets, generates a much higher volume of lint. For these high-usage situations, a more frequent cleaning schedule, such as every six months, may be advisable.
Low-Usage Households: Conversely, a household with one or two people, no pets, and a very light laundry load (e.g., two loads per week) may be able to safely extend the service interval. In these specific cases, a cycle of three to five years might be acceptable, provided the vent path is short and simple.
Regardless of the schedule, the ultimate guide for service remains the diagnostic signs detailed in Section 3. If a dryer begins to take longer than 60 minutes to dry clothes, it is time for a cleaning, no matter how recently the last service was performed.
5.2 Fortifying Your Defenses: The Critical Role of Ducting and Installation
The physical components of the vent system are the foundation of its safety. Even with regular cleaning, improper materials can pose a persistent hazard.
Material Matters: It must be stated unequivocally that flexible plastic or vinyl ducting should never be used to vent a clothes dryer. These materials are flammable and do not meet modern building and fire safety codes. Similarly, flexible foil (slinky-style) ducting is a poor choice, as it is easily crushed behind the dryer, creating severe airflow restrictions, and its ribbed surface traps lint readily. The only safe and appropriate material for dryer venting is all-metal ductwork, either rigid or semi-rigid aluminum or steel.
Installation Best Practices: The ideal vent path is as short and as straight as possible, minimizing bends to maximize airflow. The exterior vent should be equipped with a cover that prevents birds, rodents, and other pests from entering and building nests, as a nest can cause a complete and sudden blockage of the vent line. Professional services can not only clean vents but also repair or replace improper ducting and install appropriate components like bird covers or advanced magnetic vent connectors that improve both safety and convenience.
5.3 Essential Daily and Monthly Habits for Dryer Health
The homeowner’s role in this safety system is crucial and continuous. A few simple, consistent habits can significantly reduce the rate of lint accumulation and help maintain the dryer’s health between professional cleanings.
After Every Single Load: Clean the dryer’s lint filter. This is the single most important preventative maintenance task a homeowner can perform. Removing the lint from the screen after every use maximizes the trap’s effectiveness and minimizes the amount of lint that is blown into the vent system.
Monthly/Quarterly: Take a moment to clean the area around the dryer. Use a vacuum to remove any lint that has collected on the floor, behind the appliance, and around the vent connection. It is also wise to perform a quick visual inspection of the exterior vent opening to ensure the flap is clean and moving freely.
Ongoing Safety Protocols: Adherence to two cardinal safety rules is non-negotiable. First, never operate the dryer when no one is home or when everyone is asleep. Second, be particularly vigilant during winter. Regularly check the exterior vent to ensure it has not become blocked by snow or ice, which can create an immediate and dangerous backup of heat and, for gas dryers, carbon monoxide.
Conclusion: Transforming a Mundane Chore into a Critical Safeguard
The evidence presented in this report leads to an inescapable conclusion: clothes dryer vent maintenance is not an optional or cosmetic task, but a critical protocol for protecting a home and its occupants. The routine nature of doing laundry has fostered a dangerous complacency, obscuring the fact that every dryer contains the elements of a potential disaster: a heat source, a fuel source in the form of highly combustible lint, and an airflow system that can either function safely or fail catastrophically.
The analysis has demonstrated that the problem begins with a fundamental design limitation—the “25% rule” of lint escaping the trap—and is often exacerbated by modern home design, which favors longer, more complex vent paths. This leads to a cascade of consequences, a systemic failure where the initial signs of inefficiency, such as longer drying times and higher energy bills, are direct precursors to the far more severe risks of appliance failure, toxic carbon monoxide exposure, and devastating residential fires.
Homeowners are not powerless against this threat. This report has outlined a clear diagnostic framework, from the simple “60-Minute Rule” to a checklist of sensory and visual warnings, empowering individuals to identify a problem in its early stages. It has also shown that while a DIY approach is fraught with risk and inadequacy, professional service offers a comprehensive solution that addresses the entire system—from the internal workings of the appliance to the exterior vent—providing not just cleaning, but a verified safety and performance audit.
Ultimately, long-term safety is achieved through a holistic, multi-layered strategy that combines the use of proper hardware like all-metal ducting, the adoption of consistent user habits such as cleaning the lint filter after every load, and a commitment to periodic professional inspections. The modest cost of an annual professional cleaning—an investment in the range of $99 to $189—is negligible when weighed against the potential costs of a new appliance, major home repairs, or a life-altering tragedy. By embracing the knowledge and strategies outlined herein, a homeowner can move from being a potential victim of this hidden household hazard to being the proactive, informed guardian of their family’s safety and their home’s well-being.
Spring Cleaning of your home! Spring is the perfect time to refresh your space and ensure your home stays comfortable and safe year-round. Follow this step-by-step guide to effectively tackle essential cleaning and maintenance tasks.
Step 1: Declutter and Organize
Begin your spring cleaning by decluttering your spaces:
Remove unused or unwanted items.
Sort items into clear categories: keep, donate, recycle, or discard.
Invest in practical storage solutions such as shelves, bins, and baskets to maintain organization.
Additionally, staying organized will save you time in the long run. Therefore, maintaining a regular decluttering routine will be beneficial.
Step 2: Deep Clean Every Room
To avoid feeling overwhelmed, break down your cleaning tasks by room:
Kitchen: Clean appliances, sanitize counters, wipe cabinets, and mop floors.
Bathroom: Thoroughly scrub tiles, grout, toilets, sinks, and showers. Replace shower curtains or liners as needed.
Living Room and Bedrooms: Vacuum carpets, dust surfaces, wash curtains and linens, and clean windows.
Furthermore, tackling rooms individually makes the cleaning process more manageable. Consequently, you’ll see progress quicker and stay motivated.
Step 3: Check and Maintain HVAC Systems
Spring is the perfect opportunity to inspect your heating, ventilation, and air conditioning (HVAC) systems:
Replace air filters to enhance indoor air quality.
Schedule professional servicing and duct cleaning to ensure systems run efficiently.
Clean around outdoor HVAC units by removing debris and trimming nearby vegetation.
Moreover, regular HVAC maintenance prolongs system lifespan. Thus, this step helps avoid costly repairs later on.
Step 4: Inspect Plumbing and Water Fixtures
Avoid leaks and potential water damage:
Check under sinks and around appliances for leaks.
Inspect faucets, showerheads, and toilets for drips or unusual noises.
Clear slow drains using appropriate cleaners or natural methods such as vinegar and baking soda.
In addition, regular plumbing checks can prevent small issues from becoming major problems. Consequently, this helps protect your home from water damage.
Step 5: Clean Dryer Vents
Ensure your dryer remains safe and efficient:
Clean the lint filter after every use.
Schedule professional dryer vent cleaning annually to thoroughly remove hazardous lint buildup.
Additionally, proper dryer maintenance significantly reduces the risk of fires. Hence, this step is essential for your home’s safety.
Spring Cleaning
Step 6: Outdoor Maintenance
Boost your curb appeal and protect your home’s exterior:
Clean gutters and downspouts to prevent water buildup.
Inspect your roof and siding for damage or signs of wear.
Power wash driveways, patios, decks, and exterior walls for a refreshed appearance.
Furthermore, well-maintained exteriors increase property value. Therefore, regular outdoor maintenance is a worthwhile investment.
Step 7: Safety Checks
Maintain a safe and secure home environment:
Test smoke and carbon monoxide detectors, replacing batteries as necessary.
Inspect fire extinguishers and replace them if they have expired.
Ensure all doors and windows lock properly.
Moreover, frequent safety checks ensure peace of mind. Thus, you’ll sleep easier knowing your home is secure.
Step 8: Lawn and Garden Prep
Spring offers perfect conditions for enhancing your outdoor spaces:
Aerate and fertilize your lawn.
Prune trees and bushes, removing dead branches to promote healthy growth.
Plan and plant your garden beds and containers.
Additionally, a vibrant garden enhances your home’s aesthetic appeal. Therefore, investing time in gardening boosts overall enjoyment of your outdoor spaces.
By systematically tackling these tasks, you’ll significantly enhance your home’s appearance, functionality, and longevity. Happy spring cleaning and home maintenance!
Dryer vent cleaning, air duct cleaning (residential/commercial)
Quote-based (call for details)
Good reviews, professional service
Caters to both residential and commercial clients
Top Dryer Vent Cleaning Company Comparison
1. Services
The Lint King: Specialized in dryer vent cleaning with a 4-inch rotary brush for thorough lint removal, plus repairs, bird nest extraction, inspections, and utility area cleaning. Their focus is on dryer vent safety and efficiency.
Eco Green Duct Cleaning: Offers dryer vent cleaning alongside air duct cleaning. Less emphasis on specialized dryer vent services like repairs or nest removal.
Done Just Right, Inc.: Provides dryer vent cleaning, air duct cleaning, and chimney cleaning, with a strong focus on fire prevention through lint removal.
Wright Way Air Duct: Combines dryer vent and air duct cleaning, with a reputation for thorough ductwork cleaning (20+ ducts handled efficiently).
Clean Air Werks: Offers dryer vent cleaning as part of a broader portfolio including air duct and chimney cleaning, but less focus on dryer-specific services.
Ray’s Heating and Air: Integrates dryer vent cleaning with HVAC and air duct services, leveraging HVAC expertise for comprehensive home maintenance.
All Pro Air Duct Cleaning: Focuses on both residential and commercial dryer vent and air duct cleaning, offering flexibility for larger properties.
Winner: The Lint King for its specialized dryer vent services (e.g., repairs, nest extraction) and targeted approach, though Done Just Right and Wright Way are strong for comprehensive duct cleaning.
2. Pricing
The Lint King: Transparent pricing at $99–$189 (average $135), with no fuel surcharge. Discounts like $10–$15 off are available. Costs vary by vent complexity (e.g., rooftop vs. basement).
Eco Green Duct Cleaning: Advertises a $99 deal for dryer vent cleaning, but conditions may apply (e.g., vent length or accessibility), potentially increasing costs. Most budget-friendly on paper.
Done Just Right, Inc.: Quote-based pricing (call (630) 893-0757). No specific price range listed, but reviews suggest competitive rates.
Wright Way Air Duct: Quote-based (call (847) 975-3836). Likely in the $100–$200 range based on industry standards and their thorough service.
Clean Air Werks: Quote-based (no pricing online). Expected to align with industry averages ($100–$200).
Ray’s Heating and Air: Quote-based, noted for cost-effectiveness, likely competitive for Schaumburg residents.
All Pro Air Duct Cleaning: Quote-based, with pricing likely varying for residential vs. commercial jobs.
Winner: Eco Green for the lowest advertised price ($99), but The Lint King wins for transparency and no hidden fees (e.g., no fuel surcharge). Others require quotes, making cost comparison harder.
3. Reputation
The Lint King: A+ BBB rating (accredited since 2014), 5-star reviews on Yelp (14 reviews), Angi (54), Google (200), and Instagram. Praised for professionalism, same-day service, and post-job cleanup. Customers note improved dryer efficiency.
Eco Green Duct Cleaning: Mixed reviews. Some praise affordability, but others mention upcharges or inconsistent service quality. Less established than The Lint King.
Done Just Right, Inc.: Positive reviews, BBB-accredited, and well-regarded for fire safety focus. Customers value their thoroughness and family-owned approach.
Wright Way Air Duct: 5-star Yelp reviews highlight efficiency, professionalism, and cleanup after handling 20+ ducts. Strong local reputation with 15+ years experience.
Clean Air Werks: Limited reviews but generally positive. Less visibility compared to competitors.
Ray’s Heating and Air: Positive feedback for cost-effective, reliable service across Schaumburg, Elgin, and Palatine. Known for HVAC expertise.
All Pro Air Duct Cleaning: Good reviews for professional service, particularly for commercial clients, but fewer customer insights compared to The Lint King or Wright Way.
Winner: The Lint King and Wright Way tie for the strongest reputations, with consistent 5-star reviews and BBB accreditation. Done Just Right also scores well for safety focus.
4. Key Differentiators
The Lint King: Stands out for same-day service, specialized 4-inch rotary brush, no fuel surcharge, and 25+ years of experience. Their focus on dryer vent-specific services (e.g., repairs, nest extraction) sets them apart.
Eco Green Duct Cleaning: Appeals to budget-conscious customers with $99 deals, but conditions may limit savings. Less specialized in dryer vents.
Done Just Right, Inc.: Family-owned with a strong emphasis on fire prevention, making it ideal for safety-conscious homeowners.
Wright Way Air Duct: Known for thoroughness (20+ ducts cleaned efficiently) and professional cleanup, with 15+ years of experience.
Clean Air Werks: Broad service range but less dryer vent specialization, making it a generalist option.
Ray’s Heating and Air: HVAC expertise adds value for homes needing combined dryer vent and heating system maintenance.
All Pro Air Duct Cleaning: Unique for serving both residential and commercial clients, ideal for businesses or multi-unit properties.
Winner: The Lint King for its specialized dryer vent focus, same-day service, and no fuel surcharge, though Done Just Right excels for safety and Wright Way for thoroughness.
Local Comapany Recommendation
Best Overall: The Lint King is the top choice for Schaumburg residents seeking specialized dryer vent cleaning. Its transparent $99–$189 pricing, no fuel surcharge, same-day service, and A+ BBB rating make it reliable and customer-friendly. Ideal for homeowners prioritizing dryer safety and efficiency. Call (847) 874-4805 or visit thelintking.com.
Best Budget Option: Eco Green Duct Cleaning offers a $99 deal, but confirm conditions to avoid upcharges. Call (888) 611-6634.
Best for Safety: Done Just Right, Inc. emphasizes fire prevention, great for safety-conscious clients. Call (630) 893-0757.
Best for Thoroughness: Wright Way Air Duct excels in comprehensive duct cleaning with strong reviews. Call (847) 975-3836.
For most Schaumburg residents, The Lint King balances cost, quality, and specialization best. If you need a quote or want to compare, contact each provider directly, as many competitors use quote-based pricing.
A Comprehensive Guide to Static Pressure, Duct Materials, and Code Compliance
Understanding static pressure versus CFM for residential clothes dryer vents using UL-approved round and rectangular duct products. Were we include comparisons across different materials (such as rigid and flexible ducts), referencing ASHRAE guidelines and ensuring compliance with Section 504 of the International Mechanical Code (IMC), including maximum allowable duct lengths. The data is organize by duct shape, material type, and airflow rate, and includes pressure drop values accordingly.
Static Pressure vs Airflow for Residential Dryer Vent Ducts
Friction Loss and Airflow Dynamics (ASHRAE Fundamentals)
In any duct system, static pressure drop increases with airflow due to friction along the duct walls and turbulence at fittings. According to ASHRAE data, smooth round ducts have a friction factor f of around 0.025 under typical turbulent flow conditions. This means as airflow (CFM) increases, pressure loss rises roughly with the square of the velocity. A higher flow through the same duct causes disproportionately more resistance. Dryer exhaust flow rates in residences generally range from about 100 to 200 CFM for a standard dryer, but can vary (50–250 CFM is a useful range for analysis). Using standard friction charts (e.g. ASHRAE or SMACNA), a 4-inch smooth metal duct carrying ~100 CFM of air experiences on the order of 0.5–0.6 inches of water column pressure drop per 100 feet of duct. At lower flows (50 CFM) the drop is much smaller (well under 0.2 ″/100′), while at higher flows (200+ CFM) the drop becomes several inches per 100′ (exceeding what a typical dryer can overcome). This basic inverse relationship between duct size, airflow, and static pressure underpins code restrictions and sizing guidelines for dryer vents.
Round vs. Rectangular Duct Performance
Round Ducts: The standard exhaust duct for a residential dryer is a 4-inch diameter round duct. A smooth 4″ round metal duct is the baseline for code compliance and performance. Its circular cross-section (≈12.6 in² area) results in moderately high air velocity for a given CFM, which helps carry lint out but also creates friction. For instance, at 100 CFM the air velocity in a 4″ duct is roughly 1,150 ft/min, yielding about 0.6″ w.g. pressure drop per 100 ft as noted above. At 150–200 CFM, the velocity (~1,700–2,300 ft/min) causes significantly higher losses (on the order of 1.3–2.2″/100′ for a smooth 4″ duct, as shown in the table below). By contrast, increasing duct diameter can dramatically reduce pressure drop: a 5-inch duct (approx. 19.6 in² area) has about half the pressure loss of a 4-inch duct at the same flow. In fact, building experts note that a 5″ duct run can be nearly twice as long as a 4″ for the same back-pressure. However, dryer vents are required by code to be 4″ nominal diameter (to maintain sufficient velocity for lint transport), so upsizing the entire run is generally not done in practice for residential dryers. Instead, the code limits the run length to control pressure drop (discussed below).
Rectangular (“Wall Stack”) Ducts: In tight spaces, a rectangular duct of equivalent area is sometimes used for short sections (e.g. in a wall cavity behind the dryer). A common size is 3.25″ × 10″, which has a cross-sectional area (~32.5 in²) more than 2.5 times that of a 4″ round duct. This is roughly equivalent in capacity to a 6″ round duct. The much larger area means air velocity is lower for the same CFM, and friction losses are correspondingly reduced. For example, at 100 CFM, a smooth metal 3.25″×10″ duct might see only ~0.08–0.09″ w.g. per 100 ft of static pressure drop (nearly an order of magnitude less than a 4″ round in that scenario). Even at 200–250 CFM, the pressure drop in such a rectangular duct remains around 0.3–0.5″/100′ – still far below the round duct’s resistance. The trade-off is that overly large cross-sections can reduce air velocity and potentially allow lint to settle. Nonetheless, a short rectangular transition is permissible as long as the internal area is at least as large as a 4″ round and the material is smooth metal. The IMC effectively requires a minimum 4″ nominal diameter, which a 3¼″×10″ duct exceeds in area. To be code-compliant, any rectangular dryer duct segment should be made of metal with a smooth interior and meet the minimum thickness (usually 28 gauge or thicker steel, 0.016″). In practice, many 3.25″×10″ dryer transition boxes or wall ducts are 30 gauge (≈0.012″) steel – slightly thinner than code – so one should verify the product meets the IMC’s thickness requirement. When properly used, rectangular duct sections can reduce pressure loss due to their larger cross-section, thereby easing airflow for a given CFM. (For instance, one commenter notes that using a wall-stack duct “should lessen restriction” compared to a round pipe of smaller area.)
Rigid Metal vs. Flexible Duct Materials
Rigid Metal Ducts: The IMC mandates that the permanent dryer exhaust duct be constructed of metal with a smooth interior surface. Rigid galvanized steel or aluminum duct sections meet this requirement. These have relatively low friction because the interior is non-corrugated. They also maintain full 4″ diameter along bends if using long-radius elbows. The static pressure drop data above for round and rectangular ducts assumed smooth metal walls. Such rigid ducts are highly recommended for the entire concealed exhaust run due to their durability, fire safety, and airflow efficiency. All joints must be secured without intruding screws (to avoid lint snagging), typically using foil tape or clamp bands.
Flexible Ducts (Transition Hoses): A short flexible connector is often used between the dryer outlet and the wall or floor duct inlet. Building **code allows only a single transition duct, maximum 8 feet long, and it must be a product listed to UL 2158A (the standard for clothes dryer transition ducts). This rule exists because many flexible hoses (especially older plastic or thin foil types) are fire hazards and very restrictive to airflow. Non-listed vinyl or foil flex ducts are not code-compliant for dryer venting and are expressly prohibited in standards and manufacturer instructions. Even some over-the-counter foil hoses can be problematic: they often have an effective interior diameter smaller than 4″ (due to their tightly corrugated design) and a very rough interior that increases resistance. In fact, a cheap “slinky” foil hose may only have ~3.25″ actual inner diameter and a ribbed profile – this narrow, rough interior significantly restricts airflow, wasting energy by prolonging dryer cycles and contributing to lint buildup. By contrast, UL 2158A-listed transition ducts (such as semi-rigid aluminum flex or certain high-quality foil hybrids) maintain a full 4″ diameter and have smoother interiors. For example, semi-rigid aluminum flex has relatively smooth, corrugated aluminum walls; it is accepted by code because it doesn’t appreciably constrict the diameter or trap lint. These semi-rigid or UL-listed flex ducts still have higher friction than a truly smooth pipe, but their pressure drop is much lower than that of unlisted “slinky” foil. In quantitative terms, a good 4″ UL-listed flex duct might incur roughly 50–100% higher static pressure loss than an equivalent length of smooth metal duct at the same flow. (For instance, at 100 CFM, a run of UL-listed flex could have on the order of ~1.1″ w.g./100′ friction loss versus ~0.6″/100′ for rigid metal – nearly double.) In all cases, flexible ducts should be stretched taut and straight to minimize sagging or kinks which greatly add resistance. Remember that flexible duct is only permitted as the exposed transition between dryer and wall – it cannot be concealed within construction or used in place of the permanent duct system. The transition hose should be as short as possible (well under the 8 ft max) and made of a UL 2158A-listed material to meet code and safety requirements.
Static Pressure Drop Data (50–250 CFM) by Duct Type
To illustrate the above points, the table below compares static pressure drop vs. airflow for three duct configurations commonly used in residential dryer venting. The values represent approximate frictional pressure loss (inches of water column) per 100 feet of straight duct, based on standard air density and typical duct roughness for each case:
4″ Round, Rigid Metal Duct: Standard smooth galvanized steel duct (baseline case).
4″ Round, UL-2158A Flexible Duct: Representative of a good-quality semi-rigid or listed flex hose, fully extended (no kinks).
3.25″×10″ Rectangular Metal Duct: Smooth sheet metal wall-stack duct (cross-sectional area ≈32.5 in², larger than 4″ round).
Each configuration is assumed code-compliant (smooth metal interior; flex is UL-listed). Actual pressure drop in a real installation will also include losses for fittings (elbows, transitions, etc.), but those are addressed separately. The table highlights how duct shape and material affect resistance at flows from 50 to 250 CFM:
Airflow
4″ Round Metal DuctRigid, smooth interior (in. w.g./100′)
4″ Round Flex DuctUL 2158A listed (in. w.g./100′)
3.25″×10″ RectangularRigid smooth metal (in. w.g./100′)
50 CFM
~0.17″ w.g. per 100 ft
~0.28″ w.g. per 100 ft
~0.03″ w.g. per 100 ft
100 CFM
~0.60″ w.g. per 100 ft
~1.1″ w.g. per 100 ft
~0.09″ w.g. per 100 ft
150 CFM
~1.28″ w.g. per 100 ft
~2.5″ w.g. per 100 ft
~0.18″ w.g. per 100 ft
200 CFM
~2.20″ w.g. per 100 ft
~4.4″ w.g. per 100 ft
~0.30″ w.g. per 100 ft
250 CFM
~3.36″ w.g. per 100 ft
~6.8″ w.g. per 100 ft
~0.45″ w.g. per 100 ft
Notes: These figures assume straight ducts. In practice, elbows and fittings add extra equivalent length (and thus pressure drop). For instance, a sharp 90° elbow in a 4″ duct might add the equivalent of 5 feet of straight duct friction (or ~0.025″ at 100 CFM for a smooth elbow). Long-radius or specialty elbows can reduce this penalty (e.g. some smooth wide-radius 90° bends count as only ~1.75′ of equivalent length). Also note that non-listed “slinky” foil flex would have much higher losses than the “UL 2158A flex” column above – possibly 2–3 times greater than smooth duct – and is not allowed by codes.
Looking at the table, one can see the stark contrast in performance. A smooth rectangular duct carries 150–200 CFM with minimal resistance (only ~0.18–0.30″/100′), whereas a 4″ round flex at 200 CFM would be extremely restrictive (~4.4″/100′). In fact, most residential dryers cannot overcome much above ~0.5–0.6″ static pressure before their airflow drops off markedly. This is why code limits the duct length and discourages excess bends: to keep the overall static pressure within the dryer’s capability. It’s also evident why using smooth-walled metal ducts and limiting flex hose is vital for airflow efficiency.
Both the International Mechanical Code (IMC) and International Residential Code (IRC) have detailed requirements in Section 504 (or M1502 in IRC) for domestic dryer exhausts. Key code-compliant configurations and limitations include:
Duct Material and Size: Exhaust ducts must be metal, with a smooth interior, and at least 0.016″ thick (28 gauge steel). The standard size is 4″ nominal diameter for the entire run. (Equivalent-area rectangular ducts are acceptable in practice as long as they meet the 4″ diameter cross-section and thickness requirements.) Plastic or vinyl ducting is prohibited.
Transition Duct: A flexible transition hose connecting the dryer to the fixed duct must be UL 2158A listed and labeled for dryer use. It can be no longer than 8 feet and cannot pass through concealed spaces like walls or floors. This usually means the flex connector should run only from the dryer output to the wall/floor connection and remain visible/accesssible. Unlisted foil or plastic flex ducts are not allowed (and are unsafe). Always use the dryer manufacturer’s recommended transition duct or an equivalent UL-listed product for safety and code compliance.
Duct Run Length: The IMC prescribes a maximum exhaust duct length of 35 feet from the dryer connection to the external termination, not including the transition hose. This length must be reduced for any elbows in the run – the code provides an equivalent length chart (e.g. subtract 5 ft for a standard 90° elbow, 2.5 ft for a 45°). For instance, a configuration with two 90° turns would have a base limit of 35 – 2×5 = 25 feet of actual straight duct. If a dryer’s manufacturer supplies different guidelines (many high-efficiency dryers allow longer ducts), the code permits using the manufacturer’s specified length in lieu of the 35′ rule. In such cases, the installer must provide the dryer’s instructions to the inspector, and if the duct is concealed, a permanent label must be placed near the dryer stating the equivalent length of that duct system. Exceeding the allowed length is not permitted without mitigation (e.g. installing a listed booster fan designed for dryer ducts, if approved by local code).
Termination Requirements: The duct must terminate outdoors (no venting into attics or indoor spaces) in a backdraft damper outlet (hood or louver) that prevents pest entry and airflow reversal. Importantly, no screens or grills are allowed at the outlet, as they would trap lint. The termination hood usually needs a 4″ opening and should be located at least 3 feet from any building opening or air intakes (per general exhaust vent guidelines). Many codes and manufacturers specify a maximum hood guard mesh of 1/4″ if used, but for dryer vents even that can clog, hence the explicit no screen rule. The outlet hood’s design affects performance too – wide-mouth dryer caps have lower resistance than louvered vents or “stack” caps. A poor vent cap can add significant static pressure (sometimes equivalent to 5–15 feet of duct). Using a smooth, large-radius outlet fitting is thus part of an efficient design (and many manufacturers account for a typical cap in their length guidelines).
Duct Installation: Duct sections must be joined with metal tape or clamps – no sheet metal screws or fasteners protruding into the airflow. Protrusions would snag lint and increase turbulence. Support the duct at least every 4 feet to prevent sagging. Avoid kinks or crushed sections, as these create sharp resistance spikes. The duct should run as straight and short as possible, with minimal elbows, to reduce pressure drop. (Each turn and extra foot of duct makes the dryer work harder to move air.)
Makeup Air: If the dryer exhausts over 200 CFM, the code requires provisions for makeup air to the laundry area. Typically, a louvered opening of at least 100 sq.in. is needed if the dryer is in a closet or confined space. Standard residential dryers usually do not exceed 200 CFM in practice, but larger or commercial-type dryers might. The makeup air ensures the dryer and house are not starved of air (which could otherwise depressurize the room or reduce dryer performance if the exhaust outpaces the air supply).
By adhering to these limitations, the system will remain within safe and efficient operating static pressures. For example, a code-compliant installation might have a 25 ft smooth metal run with two 90° elbows and a high-quality roof cap – this setup would be within the allowed length (35 – 10 = 25 ft) and would typically impose well under 0.5″ total static pressure drop at ~100–150 CFM (roughly 0.2–0.3″ friction + some fitting losses), which most dryers can handle. In contrast, an “all-flex” duct run snaking 25 ft through an attic with several bends would far exceed acceptable back-pressure and violate code on multiple counts (material, concealment, length). Proper design and installation per Section 504 ensure the dryer’s airflow is unimpeded and lint is safely expelled.
Key Considerations for Efficient, Code-Compliant Dryer Ducts
When selecting and installing dryer ductwork, keep the following points in mind to balance airflow efficiency with code compliance:
Use Smooth, Rigid Ducting Whenever Possible: Smooth metal ducts have the lowest resistance to airflow. Every foot of smooth duct saves energy by reducing pressure drop (shortening drying times) and decreases lint accumulation. Plan the duct route with minimal elbows and transitions. Long or convoluted paths should be avoided if at all possible – try to locate the dryer such that the run is short and straight to an exterior wall.
Limit the Use of Flex Duct: Reserve flexible duct for the dryer connection only, and choose a UL 2158A-listed flex that maintains a 4″ diameter and has a smooth interior profile. Do not use unlisted foil or plastic flex ducts – they are not only against code, but also choke the airflow and pose a fire risk. Even with good flex, keep it taut and trimmed to the necessary length (excess coiled flex hose adds unnecessary resistance). A crushed or kinked flex line can be as bad as a clog in terms of static pressure.
Mind the Equivalent Length: Every elbow or fitting adds to the effective length of the duct. Use long-radius elbows (or products like a Dryer-Ell that have smoother bends) to reduce equivalent length penalties – this allows a longer actual duct run within the code’s limits. If you are nearing the 35 ft limit once you count elbows, consider re-routing to eliminate a bend, or check if the dryer’s manufacturer allows a longer run. Never ignore the length limits – an over-length duct can cause excessive back-pressure, leading to longer drying times, lint buildup, and potential overheating of the dryer.
Select a Good Vent Hood: The exhaust termination should be a UL-approved (or equivalent) dryer vent cap that opens freely and offers a large opening for exhaust. Low profile or louvered vents can create static pressure on their own; a “bird guard” screen quickly clogs with lint. Choose a cap specifically designed for dryers (wide opening, no screen) and keep it clean. This ensures the final leg of the airflow path isn’t a bottleneck.
Ensure Proper Installation and Maintenance: Install ducts per code: joints flowing in the direction of air, no interior obstructions, and provide support to prevent disconnections or low spots. After installation, it’s wise to measure the dryer’s exhaust flow or pressure if possible – some dryer manufacturers specify a maximum static pressure (like 0.6″ w.g.) at the outlet for the dryer to work correctly. Regularly clean the dryer duct (at least annually) to remove lint buildup, as even a code-compliant duct will accumulate lint over time, raising friction and fire risk. A well-designed duct that is easy to clean (e.g. one with few bends and a cleanout access if it’s very long or vertical) will perform better in the long run.
In summary, choosing the right ductwork for a clothes dryer means using a code-approved configuration that minimizes static pressure losses. Smooth, 4″ metal ducts are the gold standard for efficient airflow. If space constraints demand a different shape, use an equivalently large, smooth rectangular duct section for that portion to keep friction low. Keep duct runs within the length and elbow limits of the code (or the dryer’s specs) – this often means planning the laundry location strategically or venting the dryer to the nearest feasible exterior wall. Always use a UL 2158A-listed transition duct at the dryer, and avoid any materials or configurations not meeting the safety standards (no flimsy foil tubes in the walls!). By following these guidelines, you’ll ensure the dryer exhaust system moves the required 100–200 CFM of moist air with minimal static pressure, preserving the dryer’s efficiency and preventing hazards. Compliance with Section 504 of the IMC is not just a legal requirement – it directly translates to a safer installation and optimal dryer performance.
Sources: Standards and data from ASHRAE Fundamentals (airflow friction charts), International Mechanical Code Section 504 (2021), dryer industry research, and product literature for dryer ducts. These demonstrate how duct characteristics (shape, size, and material) influence static pressure drop and why building codes enforce specific limits to ensure residential dryer ducts remain both efficient and safe.
The laundry room, a place of routine chores, harbors an often-overlooked danger: the clothes dryer. While indispensable for modern living, this common appliance can become a significant fire hazard if not properly maintained. The culprit? Lint. Highly flammable and deceptively accumulating, lint in a clogged dryer vent is a leading cause of devastating home fires nationwide. This article delves into the alarming statistics on home fires, the science behind these fires, the warning signs to watch for, and crucial preventative measures, emphasizing how professional services like those offered by https://thelintking.com/ can safeguard your home and family.
The Startling Statistics:
Home Fires by the Numbers
The threat posed by clothes dryer fires is not trivial. According to the U.S. Fire Administration (USFA) and the National Fire Protection Association (NFPA), approximately 2,900 home clothes dryer fires are reported annually in the United States. These incidents result in an estimated five deaths, 100 injuries, and over $35 million in property damage annually. Some reports indicate even higher numbers, with dryers and washing machines combined causing an average of 15,970 fires each year, with dryers accounting for 92% of them, leading to property damage estimates ranging from $233 million to over $100 million in other analyses.
Crucially, the leading factor contributing to these fires is “failure to clean,” accounting for 34% of all dryer fires. This means a significant portion of these devastating events is entirely preventable. Lint and dust are the most common materials that ignite these fires due to their highly flammable nature. The problem is so prevalent that clothes dryers and washers cause approximately 4% of all residential fires.
Dryer fire incidents tend to be higher in the fall and winter, with January being the peak month. This seasonal spike is often attributed to increased dryer usage during colder weather and higher humidity levels that can make it more difficult for vents to stay clear. Understanding these figures underscores the critical importance of regular dryer vent maintenance, a topic further explored in resources like https://thelintking.com/blog/the-anatomy-of-a-clothes-dryer-fire/.
How a Clogged Dryer Vent Becomes a Fire Hazard:
The Science of Lint Ignition
To understand how a seemingly innocuous appliance can become a fire hazard, looking at the science behind lint ignition is essential. Clothes dryers work by tumbling clothes in heated air. As clothes dry, they shed tiny fibers, which combine with dust, hair, and other particles to form lint. The dryer’s lint trap is designed to catch most of this debris, but it’s not foolproof. Industry experts, including those at https://thelintking.com/, note that lint traps typically capture only about 75% of the lint produced. The moist, hot air carries the remaining 25% into the dryer’s exhaust vent system.
This escaped lint is highly combustible. Its fine, dry nature makes it an excellent fuel source, so much so that it’s often recommended as a fire starter for camping. As this flammable material travels through the vent duct, it can accumulate, especially in bends, elbows, or long, sagging sections of the vent pipe. This accumulation restricts airflow.
The dryer cannot efficiently expel the hot, moist air when airflow is impeded. This causes the temperature inside the dryer and the vent system to rise significantly. The dryer’s heating element continues to operate, generating more heat with nowhere to go. This excessive heat and the highly flammable lint buildup create a perfect storm. If the temperature reaches the ignition point of the lint, a fire can erupt. The fire can then spread from the vent into the surrounding wall spaces and quickly engulf the home. The journey from a simple laundry task to a potential catastrophe highlights the importance of understanding the topics covered in Clothes Dryer Vent Cleaning Education.
Clothes Dryer Home Fire
Beyond the Flames:
Other Risks of a Clogged Dryer Vent
While a home fires is the most catastrophic outcome, a clogged dryer vent poses several other risks and inconveniences that homeowners should be aware of:
Decreased Dryer Efficiency and Longer Drying Times: When airflow is restricted, your dryer has to work much harder and longer to dry clothes. A load that once took 45 minutes might now require two or even three cycles to dry completely. This inefficiency is a primary indicator of a clogged vent.
Increased Energy Consumption and Higher Utility Bills: A dryer struggling against a blockage consumes significantly more energy. This translates directly into higher electricity or gas bills, costing homeowners money month after month. Regular cleaning can lead to noticeable savings, up to $25 per month.
Potential for Carbon Monoxide Buildup: A blocked vent is particularly dangerous for gas dryers. Incomplete combustion due to poor ventilation can produce carbon monoxide (CO), a colorless, odorless, and deadly gas. If the vent is blocked, CO can be forced back into the laundry room and spread throughout the home, posing a serious health risk to occupants.
Damage to Clothing and Premature Appliance Wear: The excessive heat buildup caused by a clogged vent can damage clothing fibers, leading to premature wear and tear. Moreover, the strain placed on the dryer’s components, such as the motor and heating element, can shorten the appliance’s lifespan and lead to costly repairs or early replacement.
Mold and Mildew Growth: Trapped moisture within a clogged vent, especially in humid environments, creates an ideal breeding ground for mold and mildew. These contaminants can be circulated back into the laundry room or onto freshly dried clothes, causing musty odors and potential health issues.
These additional risks underscore that maintaining a clear dryer vent is about more than fire prevention; it is also about energy efficiency, cost savings, and a healthier home environment, as detailed in https://thelintking.com/blog/.
Home Fire Warning Signs:
Is Your Dryer Vent Crying for Help?
Your clothes dryer often provides tell-tale signs that its vent system is clogged and requires attention. Ignoring these warnings can have serious consequences. Homeowners frequently misinterpret these symptoms as problems with the dryer itself, sometimes even purchasing a new appliance when the real issue lies within the vent. Be vigilant for these common indicators:
Long Drying Times: If clothes, weighty items like towels or jeans, take noticeably longer to dry than they used to, a clogged vent is a prime suspect. A standard load should typically dry in about 45-60 minutes.
Clothes Are Unusually Hot or Still Damp: When clothes come out of the dryer extremely hot to the touch, or if they are still damp after a complete cycle, it suggests that hot air and moisture are not venting properly.
Dryer Feels Hot to the Touch: The exterior of the dryer, particularly the top, may feel unusually hot while the appliance is running or shortly after a cycle.
Burning Smell: A distinct burning odor when the dryer is in operation is a serious red flag. This could indicate that lint trapped in the vent is scorching or even igniting. If this occurs, stop using the dryer immediately and have it inspected.
Musty Odor on Clothes: If freshly dried clothes have a musty or moldy smell, it could be due to trapped moisture and lint in the vent system, fostering mold growth.
Excessive Lint Around the Trap or Outside Vent: While the lint filter catches some lint, seeing large amounts accumulating around the filter housing, behind the dryer, or around the exterior vent opening can signal a blockage further down the line.
Warm or Humid Laundry Room: A laundry room that becomes excessively warm or humid during dryer operation indicates that hot, moist air is not being effectively exhausted to the outside.
Visible Lint or Debris at the Exterior Vent Hood: If you can see lint, debris, or if the vent flap outside your house doesn’t open properly when the dryer is running, it’s a clear sign of an obstruction.
Beyond the immediate safety concerns, a clogged dryer vent can have a significant and often underestimated financial impact on homeowners. The inefficiencies and risks associated with poor venting translate into tangible costs:
Increased Energy Costs: As previously mentioned, a dryer with a restricted vent works harder and runs longer, consuming more energy. This directly leads to higher monthly utility bills. Over a year, these added operational costs can accumulate substantially. Some estimates suggest that regular cleaning can save up to $25 per month on energy costs alone. Tools like https://thelintking.com/blog (mentioned on their blog) can help homeowners understand these potential savings.
Cost of Appliance Repairs or Premature Replacement: The increased strain on a dryer operating with a clogged vent can lead to overheating components like the motor, bearings, and heating elements. This can result in more frequent breakdowns and the need for costly repairs. In severe cases, the damage can be extensive enough to shorten the appliance’s lifespan, forcing a premature and expensive replacement.
The Devastating Cost of Property Damage: Of course, the most severe financial consequence is a dryer fire. Even a small fire confined to the appliance can result in significant repair or replacement costs. If the fire spreads, the property damage can be catastrophic, running into tens or hundreds of thousands of dollars, far exceeding the $35 million national annual average when individual impacts are considered. This doesn’t account for the potential loss of irreplaceable belongings or the costs associated with displacement.
Wasted Time: While not a direct monetary cost for some, the extra time spent re-drying clothes or waiting for excessively long cycles is an inconvenience that has a value.
Investing in regular professional dryer vent cleaning is a proactive measure that enhances safety and offers a return through energy savings and extended appliance life. The relatively small cost of maintenance pales in comparison to the potential financial burdens of neglect, a point often discussed in resources like https://thelintking.com/blog/how-dirty-dryer-vents-are-draining-your-wallet-the-ultimate-guide/.
Prevention is Key:
Your Action Plan for Dryer Vent Safety
Preventing dryer fires and other vent-related issues is achievable mainly through consistent maintenance and adherence to safety best practices. Homeowners can take several proactive steps:
Clean the Lint Filter After EVERY Load: This is the simplest yet most critical habit. A clean lint filter improves airflow and efficiency, significantly reducing the lint that enters the vent system. Make it a non-negotiable part of your laundry routine.
Regularly Inspect and Clean the ENTIRE Vent System:
DIY Basic Cleaning (with Cautions): Homeowners can perform basic cleaning for accessible vent systems. This typically involves unplugging the dryer (and shutting off the gas supply for gas models), carefully moving it away from the wall, disconnecting the duct from the dryer and the exterior vent, and using a vacuum cleaner with a hose attachment and a specialized dryer vent brush to remove lint from the duct, the dryer’s exhaust port, and the exterior vent opening. Caution: Never use a leaf blower, as the high pressure can damage ductwork concealed within walls or separate connections, leading to lint and moisture accumulation inside wall cavities. Always ensure the dryer is unplugged before starting any cleaning.
Frequency: The entire vent system should be thoroughly cleaned at least once a year. Homes with heavy dryer usage, lengthy or complex vent runs, or pets that shed heavily may require cleaning more frequently, perhaps every six months.
Ensure Proper Vent Materials and Installation:
Use only rigid or semi-rigid METAL ducting for your dryer vent. Avoid flexible plastic or foil-type ducts, especially for concealed runs, as these are more prone to kinking, crushing (which restricts airflow), damage, and lint buildup, and can be highly flammable. We often encounter and replace these unsafe materials, recommending products like https://thelintking.com/products/ for safer, more efficient connections.
Keep vent runs as short and straight as possible, with minimal 90-degree bends. Each bend adds to the effective length of the vent and creates a point for lint to accumulate.
Ensure the outdoor vent flap (or hood) is clean, working correctly, and not obstructed by snow, vegetation, or animal nests. It should open freely when the dryer is running and close when it’s off.
Maintain Clear Space: Keep the area around your dryer clear of flammable items such as stored boxes, piles of clothing, cleaning supplies, and paper products.
Avoid Overloading: Do not overload the dryer. Overfilling strains the appliance, reduces airflow, and can lead to overheating.
Never Leave a Running Dryer Unattended: Do not leave the house or go to bed while the dryer operates. Many dryer fires occur when no one is awake or at home to react quickly.
Special Handling for Contaminated Items: Clothes that have come into contact with flammable substances like gasoline, cooking oils, paint thinners, or similar solvents should be thoroughly washed multiple times or, ideally, air-dried outside first before being placed in a dryer. The heat from the dryer can vaporize residues, creating flammable fumes.
While DIY efforts are beneficial, the intricacies of modern vent systems, which can run through walls, ceilings, and crawl spaces, often mean that a professional cleaning is necessary for true peace of mind. Professionals have the tools and expertise to clean the entire system thoroughly and identify potential hazards a homeowner might miss.
Essential Dryer Vent Safety Checklist
Task
Frequency
Notes
Clean Lint Filter
After Every Load
Most critical step.
Inspect Dryer Area for Flammables
Weekly
Keep clear of clutter, clothing, and chemicals.
Check Exterior Vent Flap Operation
Monthly
Ensure it opens when the dryer is on, closes when off, and is unobstructed.
Visually Inspect Vent Duct (Accessible Parts)
Quarterly
Look for kinks, damage, or loose connections.
Perform Basic DIY Vent Cleaning
Annually (or as needed)
For accessible sections, use appropriate tools.
Schedule Professional Vent Cleaning
Annually
Or more often for heavy use/long vents. Essential for thoroughness.
Check for Warning Signs
Continuously
Long dry times, hot dryer/clothes, burning smell, etc.
Verify Proper Venting Materials
Periodically
Ensure metal ducting, no plastic/foil in concealed runs.
When to Call in the Experts:
The Lint King Advantage
While diligent DIY maintenance is commendable and helpful, there comes a point where professional expertise is not just beneficial but essential for comprehensive dryer vent safety and efficiency. Even the most conscientious homeowner may lack the specialized tools and knowledge to thoroughly clean and inspect the entire vent system, especially if it involves long runs, multiple bends, or passes through inaccessible areas like attics or crawl spaces.
Why Professional Cleaning is Superior:
Thoroughness: Professionals like https://thelintking.com/ utilize specialized equipment, such as powerful vacuums and rotary brushes (The Lint King uses a 4-inch rotary brush system), to meticulously clean the entire length of the dryer vent, from the back of the dryer to the exterior termination point. This process removes impacted lint, debris, and potential blockages that DIY methods often miss.
Inspection and Diagnostics: Trained technicians do more than just clean; they inspect the entire venting system for hidden issues. This includes checking for disconnected or damaged ducts, improper joint connections, incorrect (and unsafe) materials like plastic flex hose, poor routing restricting airflow, and blockages such as bird or rodent nests. Identifying and rectifying these problems is crucial for safety and dryer performance.
Safety and Expertise: Professionals know the safety codes and manufacturer specifications for various dryer and vent types. They clean safely, minimizing any risk to your home or appliance. This expertise is significant when dealing with gas dryers or complex vent configurations.
The standard recommendation from safety experts, including the NFPA and USFA, is to have your dryer vent professionally cleaned at least once a year.
The Lint King Dryer Vent Cleaning Experts in Northern Illinois
Introducing The Lint King:
For homeowners in Northern Illinois, https://thelintking.com/ offers a comprehensive suite of services to ensure your dryer operates safely and efficiently. Their offerings extend far beyond a simple vacuuming:
Comprehensive Dryer Vent Cleaning: Thorough cleaning of the entire ductwork.
Dryer Vent Inspections and Repairs: Identifying and fixing issues like damaged or disconnected ducts or improper installations.10 Information on repairs and upgrades can often be found on their Products page.
Blockage Removal: Expert removal of obstructions, including common problems like bird’s nests.
Installation of Safe Venting Materials: Upgrading systems with high-quality, fire-resistant materials and accessories. https://thelintking.com/products/
The Lint King brings a wealth of experience, having served the region since 2005. Their commitment to quality and customer satisfaction is reflected in their positive customer feedback, including an A+ BBB accreditation, Angie’s List Super Service Awards, and numerous 5.0 Google Reviews. Furthermore, they stand behind their work with a 90-day satisfaction guarantee, offering homeowners peace of mind. This focus on providing a complete solution—diagnosing underlying problems, offering repairs, and upgrading materials, not just removing visible lint—sets a dedicated professional service apart. Homeowners need assurance that a safety-critical job is done correctly, and The Lint King’s credentials, experience, and service guarantee directly address this need.
Protect Your Home and Family Today! Don’t wait for a warning sign to turn into a disaster. Schedule your professional dryer vent inspection and cleaning with the experts at https://thelintking.com/. Residents in their service area, which includes Cook, DuPage, Kane, Lake, McHenry, and Will Counties in Northern Illinois, can easily schedule an appointment online or call them directly at (847) 874-4805.
Conclusion:
Don’t Let Lint Lurk – Secure Your Home’s Safety
The evidence is clear: clogged dryer vents are a significant leading cause of home fires, yet they are also highly preventable. The silent accumulation of lint, coupled with the heat generated by your clothes dryer, creates a dangerous combination that risks your home, property, and loved ones.
Throughout this article, the very real danger posed by lint buildup has been detailed, the subtle and overt warning signs your dryer may be giving have been identified, and the comprehensive solutions available—from diligent DIY habits to essential professional services—have been outlined. Understanding these elements empowers homeowners to move from passive risk to proactive protection. Simple steps like cleaning the lint filter after every load and ensuring the area around the dryer is clear are fundamental. However, professional intervention is invaluable for deep cleaning, and expert inspection is necessary to mitigate the hazard.
Take the most essential step towards a safer laundry room and greater peace of mind. Contact (https://thelintking.com/) today for a professional dryer vent cleaning and ensure your home is protected from this hidden fire starter. https://thelintking.com/dryer-vent-cleaning-appointments/ or Call (847) 874-4805.
About The Lint King
Since 2005, https://thelintking.com/ (more about their mission can be found by exploring their website, perhaps starting with their homepage or looking for an “About Us” section) has been dedicated to enhancing home safety and energy efficiency for residents throughout Northern Illinois. Their mission is to provide top-quality, thorough dryer vent cleaning, inspection, and repair services, giving homeowners peace of mind. With a strong emphasis on customer satisfaction, evidenced by numerous positive reviews and a 90-day satisfaction guarantee, The Lint King is your trusted partner in preventing dryer fires and optimizing your appliance’s performance.
Clogged Dryer Vent: Causes, Dangers, and Expert Solutions
A clogged dryer vent occurs when lint, debris, and other materials build up over time. This accumulation restricts airflow, reducing your dryer’s efficiency and creating potential hazards. Understanding why dryer vents become clogged and how to prevent it can save homeowners money and ensure home safety.
Why Dryer Vents Become Clogged
First, let’s identify the primary reasons for clogged dryer vents. Lint is the most common culprit. As clothes tumble dry, lint and small fibers shed and accumulate inside the dryer vent. Over weeks and months, this lint buildup becomes significant, especially in longer ducts.
Additionally, modern home designs often place laundry rooms far from exterior walls. Consequently, longer dryer vents with multiple bends or turns are created. Such complicated ductwork increases the likelihood of lint accumulation and blockages.
Risks Associated with a Clogged Dryer Vent
A clogged dryer vent isn’t just inconvenience, it’s hazardous. One major issue is backpressure. When airflow is restricted, dryers have to work harder to expel moist air. As a result, your dryer uses more energy, increasing utility costs significantly.
Furthermore, clogged vents can lead to overheating, presenting a serious fire risk. According to the U.S. Fire Administration, thousands of house fires each year are linked to dryer vent blockages. Regularly maintaining your vent system can prevent these dangerous incidents.
Signs Your Dryer Vent is Clogged
Recognizing the symptoms of a clogged dryer vent is crucial. Here are common signs:
Clothes take unusually long to dry.
The dryer feels hotter than normal to the touch.
Burning smell or unusual odors during operation.
Excess lint visible around the dryer vent opening.
If any of these signs appear, it’s critical to take immediate action.
How to Prevent Dryer Vent Clogging
Proper maintenance is key to avoiding clogged dryer vents. Here are essential tips:
Regular Cleaning: Homeowners should clean dryer vents annually, especially if the duct exceeds 25 feet in length. More frequent cleanings may be necessary depending on your laundry habits.
Appropriate Duct Material: Avoid flexible plastic ducts, as they easily crush and restrict airflow. Instead, use rigid metal or UL-approved flexible metal ducts. These materials are more durable, resist crushing, and maintain proper airflow.
Secure Connections Properly: Avoid screws and standard duct tape to connect duct sections. Screws catch lint, and regular tape dries out and fails. Aluminum foil tape is the recommended alternative, providing a smooth, lint-resistant surface.
Protect Exterior Vent Openings: Screens or cages at the external vent openings prevent animals and debris from entering. However, remember that these need frequent checking and cleaning to prevent lint buildup.
Recommended Airflow Levels
Ensuring adequate airflow is critical to dryer efficiency. Proper airflow rates at the exterior dryer vent exit should range between 15 to 20 miles per hour. If airflow is below this range, it’s likely your vent is partially or fully clogged.
Regular testing by professionals ensures optimal performance and early detection of problems.
Why Hire Dryer Vent Cleaning Experts?
While basic vent cleaning can be DIY, professional dryer vent cleaning services like The Lint King offer thorough cleaning and inspection. Professional cleaners have specialized equipment that reaches deep within the vent system, effectively removing stubborn lint and debris.
Moreover, experts can identify underlying issues such as damaged ducts, improper installations, or fire hazards, providing solutions to prevent future problems.
Schedule Professional Dryer Vent Cleaning
Ready to ensure your home’s safety and dryer efficiency? The Lint King specializes in expert dryer vent cleaning.
Have you ever wondered, “Can a clothes dryer fire happen to me?” Clothes dryer fires are more common than most homeowners realize. Understanding clothes dryer fire prevention is crucial for safeguarding your home and family. A recent incident in Illinois underscores the importance of this essential home safety measure.
Recent Clothes Dryer Fire Incident in Illinois
A recent clothes dryer fire incident occurred just before 10 pm in Hoffman Estates, Illinois. Quickly responding to the emergency were 26 firefighters from both Hoffman Estates and Schaumburg, who extinguished the fire by 10:13 pm. Officials investigating the incident identified lint buildup within the dryer venting hose and piping as the primary cause.
Why Clothes Dryer Fires Occur
Clothes dryer fires frequently occur due to lint buildup within dryer vents. Lint, highly flammable by nature, accumulates over time. When dryers heat up during regular use, trapped lint can ignite easily, creating severe fire hazards. Awareness of this risk and preventive actions are vital to keeping your family safe.
Inside A Clothes Dryer Fire
Importance of Regular Dryer Vent Maintenance
Routine dryer vent inspections and cleaning are necessary to avoid clothes dryer fires. Professionals advise at least annual cleanings to eliminate dangerous lint accumulation. Regular maintenance not only reduces fire risks but also improves dryer efficiency, cutting energy costs significantly.
Lower Energy Bills: Homeowners can see savings of approximately $30-$45 per month on gas utility bills due to increased dryer efficiency.
Faster Drying Times: Clean dryer vents improve airflow, reducing drying times and saving valuable time on laundry days.
Longer Appliance Life: Routine cleaning prevents overheating and mechanical wear, prolonging your dryer’s lifespan.
Choose Professional Dryer Vent Cleaning Services in Illinois
Professional dryer vent cleaning services, such as those offered by The Lint King Inc., provide thorough cleaning and inspection. The Lint King Dryer Vent Cleaning Experts in Illinois specialize in safely removing lint buildup, significantly reducing your home’s fire risk. Known for excellent customer service, they are a trusted choice for protecting your home and family.
About the National Fire Protection Association (NFPA)
The National Fire Protection Association (NFPA), established on November 6, 1896, focuses on minimizing fire-related losses globally. Based in Quincy, Massachusetts, NFPA is supported by 50,000 members and 9,000 dedicated volunteers committed to fire safety and prevention.
NFPA Recommendations for Dryer Fire Safety
The NFPA highlights key strategies for clothes dryer fire prevention:
Regularly clean the lint filter before and after every laundry cycle.
Inspect dryer venting systems routinely for blockages or damage.
Keep the area around your dryer clean, organized, and free from flammable materials.
Schedule annual professional dryer vent inspections, particularly for gas-powered dryers.
Act Now to Protect Your Home and Family
Proactively preventing dryer fires is essential. Avoid waiting for emergencies to prompt action. Schedule your dryer vent inspection and cleaning today with Illinois’ trusted dryer vent cleaning professionals, The Lint King Inc.
Prioritizing dryer vent safety ensures ongoing protection, peace of mind, and significant savings for your household.
High Dew Points Clothes Dryer cause condensation in the drum.
The Unseen Consequence of High Humidity: How Dew Points Affect Your Clothes Dryer
When we think about high humidity and elevated dew points, we often picture sticky skin, frizzy hair, and restless sleep. However, there’s another critical yet frequently overlooked consequence: the impact on household appliances—specifically, your clothes dryer. In this blog post, we’ll examine condensation inside dryer drums caused by high humidity and elevated dew points. Additionally, we’ll explore potential problems and share effective preventive measures.
Understanding High Humidity and Dew Points
First, it’s crucial to understand these concepts clearly. Humidity refers to the amount of water vapor present in the air. As humidity levels rise, the air becomes increasingly saturated with moisture. Consequently, this creates a muggy, uncomfortable environment. Meanwhile, the dew point is the temperature at which air reaches full saturation. At this stage, water vapor condenses into liquid form. Therefore, when humidity and dew points rise together, moisture-related issues, such as condensation inside your dryer, become much more common.
How Does Condensation Occur in Your Dryer?
Condensation happens when moisture-rich air contacts cooler surfaces. Your dryer’s metal drum often remains cooler than the humid air around it. As a result, moisture condenses onto the drum’s surface. This frequently occurs when the dryer is not running. Consequently, water droplets accumuThe Hidden Impact of High Humidity and Dew Points on Your Clothes Dryer
When you envision high humidity, you might picture sweaty skin, unruly hair, and sleepless nights. However, there’s another, often overlooked effect: how these conditions influence your clothes dryer. In this post, we will uncover how excessive moisture leads to condensation inside dryer drums. We will also discuss potential problems and present practical ways to prevent them.
Understanding High Humidity and Dew Points
First, it’s vital to grasp these two concepts. Humidity refers to how much water vapor is in the air. As it rises, the air becomes more saturated with moisture. As a result, you experience a heavy and uncomfortable environment.
Meanwhile, the dew point marks the temperature at which the air reaches complete saturation and water vapor turns into liquid. Therefore, when humidity and dew points climb together, moisture-related problems—like condensation in your dryer—become even more likely.
How Does Condensation Occur in Your Dryer?
Condensation forms when damp air meets colder surfaces. Since your dryer’s metal drum remains cooler than the surrounding humid air, moisture starts to collect on the drum’s surface. This problem often appears when the dryer is idle. As a result, water droplets can gather inside the drum, even if you aren’t running a cycle. This issue is especially widespread in basements, garages, or other spaces without climate control.
By understanding these concepts and recognizing the early signs, you can take proactive steps to protect your dryer. Above all, staying aware of humidity and dew points will help ensure your appliance runs efficiently while keeping your home comfortable.late inside the drum even when idle. This issue is especially prevalent in basements, garages, or other non-climate-controlled spaces.
Potential Problems Caused by Dryer Condensation
It’s crucial to understand the potential problems:
Prolonged Drying Times — Moisture accumulation in the drum causes clothes to dry more slowly, reducing appliance efficiency.
Increased Energy Consumption — A damp dryer drum forces the appliance to work harder and longer. This results in higher energy use, increased utility bills, and environmental impacts.
Accelerated Wear and Tear — Continuous moisture exposure can cause metal components to rust and deteriorate faster, significantly shortening your dryer’s lifespan.
Health Risks from Mold and Mildew — Persistent moisture provides an ideal environment for mold and mildew growth. This can lead to musty odors, fabric damage, and increased health risks, especially for individuals with allergies or respiratory conditions.
Effective Ways to Prevent Condensation in Your Dryer — Fortunately, you can protect your dryer with these practical measures:
Utilize a Dehumidifier — Strategically placing a dehumidifier near your dryer reduces surrounding moisture, minimizing condensation.
Ensure Proper Ventilation — Good ventilation is crucial. Position your dryer in a well-ventilated area to allow airflow and lower humidity.
Routine Maintenance and Cleaning — Wipe down the drum after each use, clean lint filters often, and periodically inspect and clean dryer vents. These actions enhance airflow and reduce moisture buildup.
Install in Climate-Controlled Spaces — If possible, place your dryer in insulated laundry rooms or other climate-controlled spaces. These areas regulate temperature and humidity, reducing condensation risks.
Dryer Vent Covers and Insulation — High-quality vent covers prevent humid outdoor air from entering. Insulating vent ducts helps minimize temperature fluctuations, further reducing condensation.
Conclusion High humidity and elevated dew points cause more than personal discomfort. They pose real risks to household appliances like clothes dryers. Understanding condensation, recognizing related problems, and applying preventive measures can protect your dryer from these unseen threats.
Keywords:
High Humidity
Dew Points
Clothes Dryer
Condensation
Moisture
Dehumidifier
Ventilation
Mold and Mildew
Energy Efficiency
Appliance Maintenance
Next time you face a particularly humid day, proactively protect your clothes dryer to keep it efficient, effective, and safe—regardless of weather conditions.
How Dew Points Affect Your Clothes Dryer – The Lint King – Dryer Vent Cleaning Experts
In today’s busy world, it’s easy to overlook essential home maintenance tasks that keep our households safe and efficient. One such critical task is dryer vent cleaning, a service frequently forgotten but vital for your home’s safety and performance. Thankfully, The Lint King – Dryer Vent Cleaning Experts are here to explain exactly why this simple maintenance step should never be ignored.
Why Dryer Vent Cleaning Matters
Over time, lint and debris naturally build up in your dryer vent. Unfortunately, this accumulation can lead to several serious issues, including:
Fire Hazards: Lint is highly flammable. In fact, according to the U.S. Fire Administration, clogged dryer vents are responsible for thousands of house fires each year.
Reduced Efficiency: Furthermore, a blocked vent forces your dryer to work harder, resulting in higher energy consumption and increased utility bills.
Shortened Appliance Lifespan: Additionally, extra strain placed on your dryer can cause frequent repairs or even necessitate an early replacement.
Poor Air Quality: Moreover, blocked vents can promote mold growth and introduce harmful contaminants into the air inside your home.
Signs Your Dryer Vent Needs Cleaning
Not sure if it’s time for a cleaning? In that case, watch out for these common warning signs:
Longer Drying Times: If clothes take multiple cycles to dry, lint buildup might be the issue.
Overheating: Is your dryer unusually hot to the touch? This typically indicates poor ventilation.
Burning Smells: A musty or burning odor during drying cycles is a clear red flag.
Excess Lint: An increase in lint accumulation on clothing or around the dryer area suggests a blockage.
The Lint King’s Expert Solutions
At The Lint King, we specialize exclusively in dryer vent cleaning, making us Illinois’ trusted experts. Our comprehensive services include:
Professional Inspection: Initially, our technicians thoroughly evaluate your dryer vent system to pinpoint specific problem areas.
Thorough Cleaning: Next, we employ specialized tools to effectively remove all lint and debris from your vent line.
Safety Checks: After cleaning, we conduct rigorous safety inspections to ensure your system operates safely and efficiently.
Maintenance Advice: Finally, we provide helpful tips on maintaining your dryer vent cleanliness between professional visits.
Benefits of Choosing The Lint King
Why select us? Here are the standout reasons to trust The Lint King:
Experienced Technicians: Our dedicated team is thoroughly trained and knowledgeable about various dryer vent systems.
State-of-the-Art Equipment: We use advanced technology to guarantee a meticulous cleaning.
Customer Satisfaction: Above all, we pride ourselves on delivering exceptional service with an unwavering focus on customer safety.
Affordable Pricing: Moreover, we offer high-quality service at competitive, budget-friendly rates.
Don’t wait for problems to arise before taking action. Regular dryer vent cleaning is a small investment with significant returns, safeguarding your home’s safety and boosting energy efficiency. Contact The Lint King – Dryer Vent Cleaning Experts today to schedule your service and gain peace of mind.
The Lint King’s Step-by-Step Instructions for Effective Dryer Vent Maintenance
Introduction: Why Dryer Vent Cleaning Matters
Cleaning your dryer vent effectively is essential for maintaining home safety and appliance efficiency. In this comprehensive guide, we’ll walk you through the necessary steps to ensure your dryer operates safely and efficiently. Moreover, you’ll learn how to prevent lint build-up, reduce fire hazards, and extend your dryer’s lifespan with easy-to-follow instructions.
Step 1: Identifying the Dryer Vent Location
First, identify where your dryer vent exits your home, typically found on an exterior wall. Knowing this location is essential since you’ll primarily perform the external cleaning there.
Step 2: Safety First and Disconnect the Dryer
Next, prioritize safety by unplugging your dryer from its power source. Additionally, if you have a gas dryer, turn off the gas supply to avoid any potential accidents.
Step 3: Removing the Vent Cover
Then, gently remove the exterior vent cover, which might require unscrewing or carefully prying it open with a tool. Be cautious to avoid damaging the vent cover or surrounding structure.
Step 4: Cleaning the Vent Opening
Now, use a vacuum cleaner with a hose attachment or a specialized vent cleaning brush to thoroughly remove lint and debris from the vent opening. This step is critical in preventing blockages that could lead to fires.
Step 5: Interior Cleaning Inside the Dryer
After cleaning externally, head indoors and vacuum the area where the vent connects to your dryer. Often overlooked, this step is crucial for eliminating lint buildup inside the appliance itself.
Step 6: Utilizing a Vent Cleaning Kit
Next, consider using a dryer vent cleaning kit for a deeper clean. These kits typically feature a long, flexible brush and extension rods designed to reach deep within the vent, ensuring a thorough cleaning.
Step 7: Reassembling the Vent System
After cleaning, carefully reattach the vent to your dryer. Ensure the connection is secure, and confirm there are no cracks or leaks that could allow lint to escape.
Step 8: Testing the Dryer
Finally, reconnect your dryer to the power source (and turn on the gas, if applicable). Run the dryer for several minutes to ensure it operates correctly and verify that air flows freely through the vent.
Importance of Regular Dryer Vent Maintenance
Regular dryer vent maintenance isn’t merely about efficiency—it’s crucial for safety. Lint build-up significantly increases the risk of fires. Therefore, it’s advisable to clean your dryer vent at least once a year or more frequently if you notice performance issues. Furthermore, households with pets or larger families should clean the vents more regularly due to increased lint accumulation.
Primarily, cleaning your dryer vent enhances safety since lint is highly flammable. Regular cleaning reduces the risk of fire, protecting your home and loved ones.
Improved Efficiency and Cost Savings
Additionally, a clean vent allows your dryer to function efficiently. When airflow is restricted by lint build-up, drying takes longer, increasing energy consumption and utility bills. Consequently, regular cleaning provides noticeable cost savings.
Extended Dryer Lifespan
Moreover, regular vent maintenance helps extend the life of your dryer. Clogged vents cause overheating, potentially leading to appliance damage or failure.
Better Clothing Care
Furthermore, a well-maintained vent dries clothes evenly and promptly, protecting fabrics and preserving clothing quality over time.
Environmental Benefits
Lastly, efficient dryers consume less energy, benefiting both your wallet and the environment by reducing energy usage and carbon emissions.
Conclusion
In conclusion, regularly cleaning your dryer vent provides significant benefits, from enhancing home safety and appliance efficiency to reducing environmental impact. Making dryer vent maintenance part of your annual home-care routine is a wise investment in safety, cost savings, and peace of mind. Although it may seem minor, the impact of a clean dryer vent on your household’s safety and efficiency is substantial. So, make dryer vent cleaning a regular practice and enjoy a safer, more efficient home.
Are you wondering if you really need to clean your clothes dryer vent? The short answer is yes. Regular maintenance plays a vital role in keeping your dryer efficient, safe, and long-lasting. In this article, you will discover why dryer vent cleaning is crucial, how to recognize warning signs, and whether to tackle the job yourself or hire a professional.
Understanding the Clothes Dryer Vent
Before getting into the details, let’s explore what a clothes dryer vent is and how it works. This vent is responsible for directing hot air, moisture, and lint from the dryer to the outside of your home. It prevents excessive heat and humidity from building up inside. As a result, it helps your clothes dryer run smoothly and reduces the risk of damage or hazards.
The Importance of Cleaning Your Dryer Vent
Preventing Fire Hazards
Moreover, cleaning your dryer vent helps reduce the risk of fire. Over time, lint builds up and creates a flammable material. If the vent is clogged, hot air can’t escape properly, making lint ignition more likely. By removing this buildup, you safeguard your home and loved ones.
Improving Efficiency
In addition, a clogged vent restricts airflow. This blockage forces your dryer to work harder and longer. You will notice longer drying times, higher energy use, and bigger utility bills. When the vent is clear, air moves freely, and your dryer can operate at peak efficiency.
Extending Appliance Lifespan
Furthermore, a clear vent reduces strain on your dryer’s internal parts. When airflow is restricted, your appliance experiences extra stress. Over time, this stress can shorten its lifespan. Regular cleaning protects your investment by keeping your dryer running smoothly for years to come.
Preventing Mold and Mildew
Additionally, blocked vents can trap moisture in your laundry area. This damp environment encourages mold and mildew growth, which can harm your health and damage walls or flooring. By ensuring proper ventilation, you reduce these risks and maintain a healthier home.
Signs Your Dryer Vent Needs Cleaning
Pay attention to warning signs that suggest it’s time for a thorough cleaning:
Long Drying Cycles: Clothes take longer than usual to dry.
Excessive Lint: Lint builds up around the dryer or vent area.
Burning Smell: A burning odor during or after drying signals possible lint ignition.
Hot Dryer or Laundry Room: Heat lingers when hot air can’t escape properly.
Reduced Airflow: Weak air circulation from the vent indicates a blockage.
Lint Outside the Vent Opening: Visible lint near the vent exit shows an internal buildup.
How Often Should You Clean Your Dryer Vent?
Generally, cleaning your vent once a year is wise. However, larger households or heavy usage may need more frequent cleanings, such as every six months. Keep an eye on the warning signs. If you notice any of them sooner, schedule a cleaning right away.
Clothes Dryer Vent Cleaning
Clothes Dryer Vent Cleaning
DIY vs. Professional Cleaning
Some homeowners try to clean the vent themselves. They disconnect it, use special brushes, and remove lint. This approach can work but may be time-consuming and tricky if you lack tools or expertise.
In contrast, professional dryer vent cleaning services offer peace of mind. Experts have the right skills and equipment for a thorough job. They also spot potential issues like damaged ducts or poor installations. By hiring a pro, you avoid accidents, incomplete cleanings, and additional repairs.
Conclusion
In conclusion, regular dryer vent cleaning is a must. It helps prevent fires, improves efficiency, and extends the life of your clothes dryer. If you notice longer drying times, burning smells, or extra lint, it’s time for a cleaning.
For many people, hiring a professional dryer vent cleaning service is the safest and most effective option. By doing so, you protect your investment and maintain a healthier living space. Don’t overlook this simple yet essential maintenance task. Ultimately, a clean dryer vent safeguards your home and keeps your appliance running at its best.
Remember, a clean dryer vent protects your investment and promotes a safer and healthier living environment. Pay attention to this essential maintenance task and prioritize regularly cleaning your clothes dryer vent.
Learn how neglecting your dryer vents can lead to increased utility bills, costly repairs, and even put your home at risk.
It’s not just the lint you can see causing a problem. Clogged vents reduce the efficiency of your dryer, leading to higher energy consumption and shorter appliance lifespans.
Energy Consumption and Utility Bills
A dryer with a clogged duct works harder to dry your clothes, consuming more energy and raising your utility bills. Regular cleaning and maintenance can save you up to $25 per month in energy costs.
Appliance Lifespan and Repair Costs
Overworked dryers are more prone to breakdowns and have shorter lifespans. Neglected ducts can result in costly repairs or even the need for a complete dryer replacement.
Health and Safety Risks Associated with Dirty Dryer Vents
Poorly maintained dryer vents can pose severe health and safety risks for you and your family.
Fire Hazards
Lint is highly flammable. When the ductwork becomes clogged, the risk of a fire increases significantly. In the United States, nearly 15,000 fires are caused annually.
Carbon Monoxide Poisoning
Gas appliances produce carbon monoxide, which can be deadly if not properly vented. Blocked vents may cause the dangerous gas to leak back into your home, posing a severe health risk.
How to Detect Clogged Dryer Vents
Be vigilant and watch for these common warning signs.
Longer Drying Times
If your dryer takes longer than usual to dry clothes, it may be due to clogged ductwork.
Overheating Dryer
When ducts are blocked, dryers can overheat. If the exterior of your dryer feels hot to the touch or your clothes come out excessively hot, it’s time to check your ducts.
Unpleasant Odors
A musty or burning smell from your dryer may indicate that lint is trapped inside the duct.
The Benefits of Regular Dryer Vent Cleaning
Regular maintenance of your dryer vents offers numerous advantages.
Improved Efficiency
Clean ducts allow your dryer to operate efficiently, reducing energy consumption and lowering utility bills.
Increased Appliance Lifespan
Routine maintenance helps extend the life of your dryer, saving you money on costly repairs and replacements.
Enhanced Safety
Regular cleaning reduces the risk of fires and carbon monoxide poisoning, keeping you and your family safe.
Dryer Vents Best Practices for Cleaning and Maintenance
Follow these steps to ensure your ductwork remains clean and functional.
DIY Cleaning
Disconnect the dryer from the power source.
Detach the duct from the dryer and the wall.
Use a vent brush to remove lint buildup from the vent and duct.
Reattach the vent and reconnect the power.
Professional Services
If you are uncomfortable cleaning yourself or suspect your ducts may have extensive blockages, it’s best to hire a professional vent cleaning service like The Lint King – Dryer Vent Cleaning Experts.
When to Clean Your Dryer Vents
Experts recommend cleaning dryer vents at least once a year. However, checking more frequently if you use your dryer often or have a large household may be beneficial.
Conclusion
Dirty dryer vents are more than just a nuisance. They’re a hidden drain on your wallet, potentially threatening your home’s safety. Therefore, it’s important to stay vigilant for signs of clogging. By maintaining a regular cleaning schedule, you can ensure your dryer operates efficiently. Consequently, this could save money and, most importantly, keep your home safe.
Did you know cleaning your washing machine’s drum can improve its performance? Over time, soap scum and mineral deposits can build up, reducing efficiency and poor cleaning results. Regularly cleaning your machine’s drum can help ensure that your clothes are as clean as possible and your washing machine operates at peak efficiency.
Prevents Mold and Odors
Nobody wants their clothes to come out of the washing machine smelling worse than when they went in. Unfortunately, that can happen if you don’t maintain a clean drum. Damp conditions inside the drum can lead to the growth of mold, mildew, and bacteria, which can cause unpleasant odors and even damage your clothes. Regular cleaning will help prevent these issues and keep your laundry smelling fresh.
Extends the Life of Your Machine
Routine cleaning of your washing machine’s drum can also help extend its lifespan. Built-up grime and deposits can strain your machine’s components, leading to premature wear and potential breakdowns. A clean drum is a happy drum, a longer-lasting washing machine.
How Often to Clean Your Washing Machine’s Drum
Factors to Consider
There’s no one-size-fits-all answer to how often you should clean your washing machine’s drum, as it depends on various factors. These include:
How often do you use your machine?
The hardness of your water
The type of detergent you use
Generally, cleaning your drum once every month or two is a good idea. However, if you notice any issues like odors or reduced efficiency, it might be a good idea to clean it more frequently.
Step-by-Step Guide to Cleaning Your Washing Machine’s Drum
Gathering the Necessary Supplies
Before you start, gather the following supplies:
White vinegar
Baking soda
A clean cloth or sponge
A toothbrush (optional)
Preparing Your Washing Machine
First, make sure that your washing machine is empty and switched off. Remove debris from the drum, such as lint or stray hairs, and check the seals and gaskets for any signs of wear or damage.
Cleaning the Drum with Vinegar
Next, pour 2 cups of white vinegar into the detergent dispenser or directly into the drum if your machine doesn’t have a dispenser. Run a hot water cycle without any clothes or detergent. The vinegar will help to break down any build-up and sanitize the drum.
Rinsing and Finishing Up
Once the vinegar cycle is complete, sprinkle ? cup of baking soda inside the drum and run another hot water cycle. This will help to remove any lingering odors and residue further. After the baking soda cycle, use a clean cloth or sponge to wipe down the inside of the drum, paying particular attention to any stubborn spots. You can also use a toothbrush to scrub around the seals and gaskets if needed.
Additional Tips for Keeping Your Washing Machine Clean
Regular Maintenance
In addition to cleaning the drum, performing regular maintenance on your washing machine is essential. This includes checking and cleaning the lint filter, inspecting the hoses for any signs of wear or damage, and keeping the machine’s exterior clean and dust-free.
Using the Right Detergent
Always use a detergent compatible with your washing machine and follow the recommended dosage instructions. Too much detergent can cause excess suds and residue, contributing to the build-up inside your drum.
Avoid Overloading
Overloading your washing machine can lead to poor cleaning results and put extra strain on the machine’s components. Follow the manufacturer’s guidelines for load size and ensure that your clothes have enough room to move around freely inside the drum.
Conclusion
Cleaning your washing machine’s drum is crucial to maintaining your appliance and ensuring optimal performance. By following the simple steps outlined above and adopting good laundry habits, you can prevent unpleasant odors, extend the life of your machine, and keep your clothes looking and smelling their best.
FAQs
1. Can I use bleach instead of vinegar to clean my washing machine’s drum?
Yes, you can use bleach instead of vinegar, but be cautious not to mix bleach with any other cleaning agents, as this can create dangerous fumes. Use 1 cup of bleach instead of vinegar and follow the abovementioned steps.
2. How can I tell if my washing machine’s drum needs cleaning?
Signs that your washing machine’s drum needs cleaning include unpleasant odors, reduced efficiency, and visible residue or build-up. If you notice any of these issues, it’s time to thoroughly clean.
3. Can I use natural alternatives to vinegar and baking soda?
You can use alternatives like lemon juice or citric acid instead of vinegar and coarse salt instead of baking soda. However, vinegar and baking soda are generally more effective and widely available.
4. Can I clean my washing machine’s drum with commercial cleaning products?
Yes, there are commercial washing machine cleaners available that can be used to clean the drum. Always follow the manufacturer’s instructions and ensure the product is compatible with your specific washing machine model.
5. How can I prevent mold and mildew growth in my washing machine’s drum?
Always leave the washing machine door open after each cycle to prevent mold and mildew growth, and allow the drum to air dry. Also, avoid using excessive detergent, which can contribute to moisture build-up.
If you’ve noticed birds nesting in your home’s exhaust vents, taking quick action is essential. Promptly addressing this issue protects your property from potential damage and ensures the safety of the birds. In this guide, we’ll walk you through inspecting the nest, safely removing it, cleaning the dryer vent, and installing bird and rodent covers to prevent future issues.
Table of Contents
Introduction
Inspecting the Nest
Scaring Birds Away
Removing the Nest
Cleaning the Dryer Vent
Adding Bird and Rodent Covers
Maintenance and Inspection
Conclusion
FAQs
Inspecting the Nest
Before removing the nest, first carefully inspect it. Look for loose debris or damage to the dryer vent, such as cracks or missing parts. Additionally, nests can extend 6-8 feet into the ductwork, requiring special tools for removal and cleaning.
Scaring Birds Away
Once you’ve completed the inspection, the next step is safely scaring away the birds. Loud noises, like clapping or banging on a pot, effectively deter birds without harming them. Always wear protective clothing and approach the nest cautiously.
Removing the Nest
After the birds are gone, you can safely remove the nest. Always wear gloves during this process. Place the removed nest in a plastic bag and dispose of it according to local regulations.
Cleaning the Dryer or Bathroom Vent
Next, thoroughly clean the dryer vent. Bird droppings and lint buildup inside the ducts can create a fire hazard. You can use a specialized dryer vent cleaning kit or hire a professional service if needed.
Adding Bird and Rodent Covers
To prevent future nesting and rodent intrusion, consider installing bird and rodent covers on your exhaust vents. These covers act as barriers but require regular maintenance. Inspect them monthly to remove any lint accumulation, as clogged mesh can significantly increase drying times and pose additional hazards.
Maintenance and Inspection
Regular dryer vent maintenance and inspections are critical for preventing fires and extending the appliance’s lifespan. Experts recommend inspecting and cleaning dryer vents at least once a year. Additionally, homeowners should conduct monthly visual inspections to detect issues early.
The Lint King Dryer Vent Cleaning Experts
Conclusion
In summary, removing a bird’s nest involves careful inspection, safe removal, thorough cleaning, and installing preventative measures. Following these steps protects your home, ensures bird safety, and maintains the efficiency of your dryer vent.
FAQs
What is the best way to scare birds away from a dryer vent nest? Loud noises like clapping or banging pots effectively scare birds away without harming them.
Can bird droppings in a dryer vent cause a fire hazard? Yes, accumulated bird droppings and lint inside ducts significantly increase fire risk.
How often should my dryer vent be inspected and cleaned? Inspect and clean your dryer vent at least once annually.
Do bird covers require more maintenance? Yes, bird covers require regular maintenance and monthly inspections due to potential lint clogging.
Can I clean my dryer vent myself? You can use a specialized cleaning kit for dryer vents. If you’re uncomfortable or the vent is hard to reach, hiring a professional is recommended.
How do I dispose of a bird’s nest? Place the nest in a plastic bag and dispose of it according to local trash or recycling regulations.
How do I know if my dryer vent is clogged? Signs include longer drying times, musty odors, excessive heat, and lint accumulation around the vent. Inspect immediately if you notice these symptoms.
To clean Your dryer vent you first need to know it’s the essential role in your home’s laundry system. However, they’re frequently overlooked during routine cleaning and maintenance. Unfortunately, neglecting your dryer vents can lead to serious hazards, including lint buildup, clogged ducts, and even fires.
This guide outlines why cleaning your dryer vents is crucial and provides clear, step-by-step instructions for safely and effectively completing the task.
Why You Should Clean Your Dryer’s Ductwork?
First and foremost, cleaning your dryer vents helps prevent fires. According to the National Fire Protection Association, clothes dryers cause approximately 15,500 fires annually in the United States. Tragically, these fires result in around 51 deaths, 380 injuries, and roughly $236 million in property damage each year.
In addition to reducing fire risks, regularly cleaned dryer vents provide several other benefits:
Improved Efficiency: Clogged vents make your dryer work harder and longer, increasing energy use and your utility bills.
Longer Appliance Life: Preventing unnecessary wear and tear on your dryer extends its lifespan.
Ideally, you should clean your dryer vents every 1-2 years. However, if you use your dryer frequently, it’s best to clean your vents annually. Additionally, perform an immediate cleaning if you notice signs of blockage, such as:
Longer drying times
Clothes that remain damp after a cycle
A burning smell from the dryer
Step-by-Step Guide to Cleaning a Dryer’s Ductwork?
Fortunately, cleaning dryer vents is straightforward with just a few basic tools. Here’s a simple, effective method:
Step 1: Unplug the Dryer
First, unplug your dryer to eliminate electrical hazards.
Step 2: Locate the Vent
Next, locate the vent, usually situated at the back of the dryer, connecting to an external wall through a flexible metal duct.
Step 3: Disconnect the Duct
Carefully detach the metal duct from both the dryer and the wall vent.
Step 4: Clean the Vent and Duct
Then, use a vacuum cleaner or brush to remove lint and debris from the duct and vent. For deeper cleaning, consider using a specialized flexible lint trap brush.
Step 5: Reassemble the Duct
After cleaning, securely reconnect the metal duct to both the applaince and the external ductwork.
Step 6: Verify Proper Operation
Lastly, turn on your dryer to ensure it operates correctly. Check for leaks or unusual sounds.
Dryer vent facts
Tips for Effective Maintenance
To make your laundry appliances even more effective, follow these additional tips:
Use a High-Powered Vacuum: A powerful vacuum makes lint and debris removal faster and easier.
Clean the Lint Trap Regularly: Remove lint from your dryer’s lint trap after every use to prevent buildup.
Avoid Foil or Plastic Ducts: Opt for flexible metal ducts instead, as foil or plastic ducts can easily crush, creating fire hazards.
By consistently following these guidelines, you’ll ensure a safer home and a more efficient dryer.
Residual laundry detergent, fabric softener, and built-up debris can get stuck in your washer, dryer drum, and doors. Clothes washers will grow mold and develop a musty smell, especially front-loaders! To dodge this, clean your appliance regularly and do it thoroughly.
Bad Odors and Mildew Smell in Washer and Dryer Drum
Washer and Dryer Drum Cleaning
After every wash, remove debris, pet fur, or hair so it doesn’t redeposit on future loads. Every three months, give your washing machine a deep clean. Some washers have a dedicated cleaning cycle; I still thoroughly clean them with 1/2 cup of liquid chlorine bleach added to the dispenser and running a regular hot water cycle. You can use cleaners like Affresh or Tide Washing Machine Cleaner. Front loaders must be wiped, including the rubber seal on the door.
Similar to washing machines, dryers require routine maintenance. Regularly clean the lint trap before and after every load. Also, once a month, clean the assembly around the lint filter. First, pull out any lint you can grab, and then use a vacuum and a dryer airway brush to remove the loose debris.
The clothes Dryer Drum Needs to be Cleaned Often
It would also be great if you vacuumed behind and under the machine at least once a year. Make the job more accessible with a MagVent professionally installed by The Lint King to make pulling your dryer away from the wall easier. And if it’s been a while since the last dryer duct cleaning, The Lint King has a special offer of $15 Off any dryer vent service.
Clothes dryer vent maintenance is a reliable method to speed up clothes drying while managing lint accumulation. Consumers’ busier lifestyles dictate today’s modern laundry rooms and a surge in demand for dryer vent cleaning.
Every year millions of laundry appliances are purchased, making proper dryer venting practices paramount. This is critical in homes and commercial sector entities, such as salons, pet grooming, medical, and rehabilitation centers. Developments in these sectors point to the increased demand for large-capacity dryers. This illustrates the critical need to ensure their longevity through adequate venting of hot air.
The Lint King Inc. is raising awareness about how dryer vents cleaning facilitates efficient airflow and reduces the risk of a clothes dryer fire.
The #1 challenge is educating homeowners on the importance of dryer vent maintenance.
Many research studies reveal that house fires caused by low dryer airflow are far more common than generally thought. They call for stringent regulations and standards for dryers and their ductwork installation.
The manufacturers like Samsung, GE, LG, Maytag, and others have implemented backpressure sensors. This sensor is a measure of the machine’s airflow efficiency.
Consequently, the regulatory bodies have imposed stringent policies that approve only specific dryer vent designs that improve safety.
There’s a growing demand for ventless dryers over vented alternatives for commercial use. There’s an inherent problem of lint accumulation in the dryers’ de-humidification system within the appliance. Ventless dryers also lead to overheating, longer cycle times, damage to clothing, and fire breakouts.
Clothes Dryer Lint Explained by The Lint King Dryer Vent Cleaning Experts
Understanding clothes dryer lint is crucial for maintaining home safety. While most homeowners regularly change their car’s oil to ensure reliability, few pay attention to hidden dangers lurking in their laundry rooms. Did you know your clothes dryer is the second most common appliance to cause house fires?
According to the National Fire Protection Association (NFPA), dryers cause approximately 14,692 home fires annually. Therefore, performing regular dryer vent maintenance is essential for preventing fires caused by dust, fiber, and lint buildup.
Clothes Dryer Fire
How Clothes Dryer Fires Start
First, consider how your dryer works. The internal blower fan creates airflow up to 25 MPH, expelling hot, moist air and lint from your laundry to the outdoors. But not all lint leaves your dryer safely.
What’s in Your Dryer Vent?
Typically, lint traps capture only about 75% of lint, hair, fur, and paper debris. So, what happens to the rest? Unfortunately, this remaining debris accumulates in bends, turns, and rough surfaces within the vent system.
Clogged dryer vent
Why Clothes Dryer Fires Occur
Usually, lint gathers in 90-degree bends or along lengthy vent runs, significantly restricting airflow. This blockage increases the risk of overheating and potential fires. You can read more about appliance overheating on the TLK blog here.
Interestingly, lint is highly combustible. In fact, Boy Scouts often use lint as a fire starter due to its flammability!
Ideal Dryer Vent Setup
Ideally, your dryer vent should be short, straight, and directly connected to an outside wall with about two feet of ductwork. However, many homes have duct runs exceeding 60 feet with multiple turns. Shorter vents always provide better safety and efficiency.
Location Matters for Dryer Vents
Today, architects often position laundry rooms in convenient locations within the home. Unfortunately, this convenience can lead to hard-to-reach vents, complicating routine maintenance and cleaning.
It’s also crucial to use solid metal materials for dryer venting rather than flexible foil or semi-rigid tubing. The Lint King frequently finds these materials crushed, restricting airflow and causing leaks into laundry rooms. For more on this, see our guide on a Better Clothes Dryer Transition Hose.
Dryer Vent Cleaning, Repair, and install.
Professional Dryer Vent Cleaning, Repair, and Installation
At The Lint King Dryer Vent Cleaning and Repair Experts, owner Paul Meyers and our team aim to educate homeowners about dryer vent safety. Regular maintenance helps prevent fires and reduces energy consumption.
First, of course, is to remove the lint trap from the clothes dryer. Then, using a dry brush, remove all loose debris, such as lint, hair, and pet fur.
Now that the lint trap is prepped? Soak it in hot water for about fifteen minutes.? Then, using a bristle brush, gently work dishwashing soap into both sides of the screen. Let it sit and soak for about thirty minutes.
Rinse the screen with hot water and examine it for discoloration or filmy residue. Let it air dry before putting it back in the clothes dryer.
Cleaning The Clothes Dryer Lint Trap
How to Clean a Clogged Dryer Lint Trap?
Regular cleaning will keep the appliance running efficiently. Clothes drying can use a lot of energy when the time to dry increases. The average cost to dry one load of laundry is $0.21. The cost can easily double or even triple because of the long drying time. A clogged vent often causes this airflow restriction. ( Lint, Hair, Pet-Fur)
Proper clothes dryer vent safety begins with correct installation and regular maintenance. Following these clothes dryer vent safety and installation tips will reduce risks like fire hazards and improve dryer efficiency.
Understanding Dryer Vent Length and Installation
First, ensure that the concealed rigid metal ducting length does not exceed the recommended limits. According to general guidelines, ducting length should not surpass 35 feet. However, the International Residential Code (IRC) limits this to 25 feet. Always verify local building codes and manufacturer recommendations to ensure compliance.
Additionally, deduct length from the total allowable duct distance for each fitting used. Specifically:
Deduct 5 feet for every 90-degree elbow.
Deduct 2.5 feet for every 45-degree fitting.
An exception to this deduction rule exists when using Dryer-Ell fittings, as specified under the 2006 IRC Section M1502.6, 2009 IMC Section 504.6.4, and 2009 IRC Section M1502.4.
Independent Dryer Vent Systems
Furthermore, your dryer venting system should be completely independent. Never connect dryer venting to other exhaust systems like chimneys or kitchen exhausts. Combining vents can cause dangerous backflows and significantly increases fire risks.
Proper Vent Termination and Hood Installation
Moreover, vent termination is crucial. Always terminate dryer vents outdoors using an approved hood or roof cap fitted with a backdraft damper. This damper prevents external air from entering the duct, reducing backpressure and fire risk.
Also, avoid using small-orifice metal screening on vent hoods. Although screening may seem like a preventative measure, it quickly accumulates lint and causes blockages. Instead, the hood opening should point downward, with at least 12 inches clearance above ground level or any obstruction. This ensures adequate airflow and lint dispersal.
Clothes Dryer Plastic Duct Safety Issue
Plastic dryer ducts pose significant safety concerns. Unfortunately, plastic flex ducts, characterized by a spring wire wrapped in plastic, are still found in older homes. This material is highly flammable and susceptible to damage, substantially increasing fire risks.
Replacing Plastic Flex Ducts
Therefore, always replace plastic dryer ducts with safer materials such as rigid or semi-rigid metal ducts. Metal ducts withstand high temperatures better, resist crushing, and are less prone to lint buildup.
Moreover, I’ve personally witnessed multiple homes using various hazardous materials in dryer ducting, underscoring the importance of regular inspections and updates to safer vent materials.
Routine Maintenance for Dryer Vent Safety
Routine maintenance is essential to dryer vent safety. Lint accumulation leads to increased backpressure in dryer exhaust pipes. Over time, this buildup restricts airflow, causing the dryer to work harder, resulting in overheating and potential fires.
Regular Inspections and Cleaning
To combat these hazards, inspect dryer vents regularly—at least once a year—and schedule professional cleaning when needed. Regular maintenance not only prevents fires but also extends the life of your dryer and reduces energy bills.
Signs You Need Maintenance
Pay attention to these indicators that your dryer vent may need immediate attention:
Clothes take longer to dry.
Dryer feels excessively hot.
Burning smell during operation.
Visible lint around the dryer or vent area.
Act promptly if you notice any of these warning signs to maintain dryer safety.
Learn More About Clothes Dryer Safety
In conclusion, clothes dryer vent safety and proper installation practices significantly enhance household safety, appliance efficiency, and energy savings. Stay proactive, replace hazardous materials promptly, and prioritize routine inspections and maintenance for optimal safety.