
A Comprehensive Guide to Dryer Vent Cleaning
To clean Your dryer vent you first need to know it’s the essential role in your home’s laundry system. However, they’re frequently overlooked during routine cleaning and maintenance. Unfortunately, neglecting your dryer vents can lead to serious hazards, including lint buildup, clogged ducts, and even fires.
This guide outlines why cleaning your dryer vents is crucial and provides clear, step-by-step instructions for safely and effectively completing the task.
Why You Should Clean Your Dryer’s Ductwork?
First and foremost, cleaning your dryer vents helps prevent fires. According to the National Fire Protection Association, clothes dryers cause approximately 15,500 fires annually in the United States. Tragically, these fires result in around 51 deaths, 380 injuries, and roughly $236 million in property damage each year.
In addition to reducing fire risks, regularly cleaned dryer vents provide several other benefits:
- Improved Efficiency: Clogged vents make your dryer work harder and longer, increasing energy use and your utility bills.
- Longer Appliance Life: Preventing unnecessary wear and tear on your dryer extends its lifespan.
- Eliminating Odors: Regular cleaning helps avoid unpleasant odors caused by lint buildup.

How Often Should Clean Your Dryer’s Ductwork?
Ideally, you should clean your dryer vents every 1-2 years. However, if you use your dryer frequently, it’s best to clean your vents annually. Additionally, perform an immediate cleaning if you notice signs of blockage, such as:
- Longer drying times
- Clothes that remain damp after a cycle
- A burning smell from the dryer
Step-by-Step Guide to Cleaning a Dryer’s Ductwork?
Fortunately, cleaning dryer vents is straightforward with just a few basic tools. Here’s a simple, effective method:
Step 1: Unplug the Dryer
First, unplug your dryer to eliminate electrical hazards.
Step 2: Locate the Vent
Next, locate the vent, usually situated at the back of the dryer, connecting to an external wall through a flexible metal duct.
Step 3: Disconnect the Duct
Carefully detach the metal duct from both the dryer and the wall vent.
Step 4: Clean the Vent and Duct
Then, use a vacuum cleaner or brush to remove lint and debris from the duct and vent. For deeper cleaning, consider using a specialized flexible lint trap brush.
Step 5: Reassemble the Duct
After cleaning, securely reconnect the metal duct to both the applaince and the external ductwork.
Step 6: Verify Proper Operation
Lastly, turn on your dryer to ensure it operates correctly. Check for leaks or unusual sounds.
Tips for Effective Maintenance
To make your laundry appliances even more effective, follow these additional tips:
- Use a High-Powered Vacuum: A powerful vacuum makes lint and debris removal faster and easier.
- Clean the Lint Trap Regularly: Remove lint from your dryer’s lint trap after every use to prevent buildup.
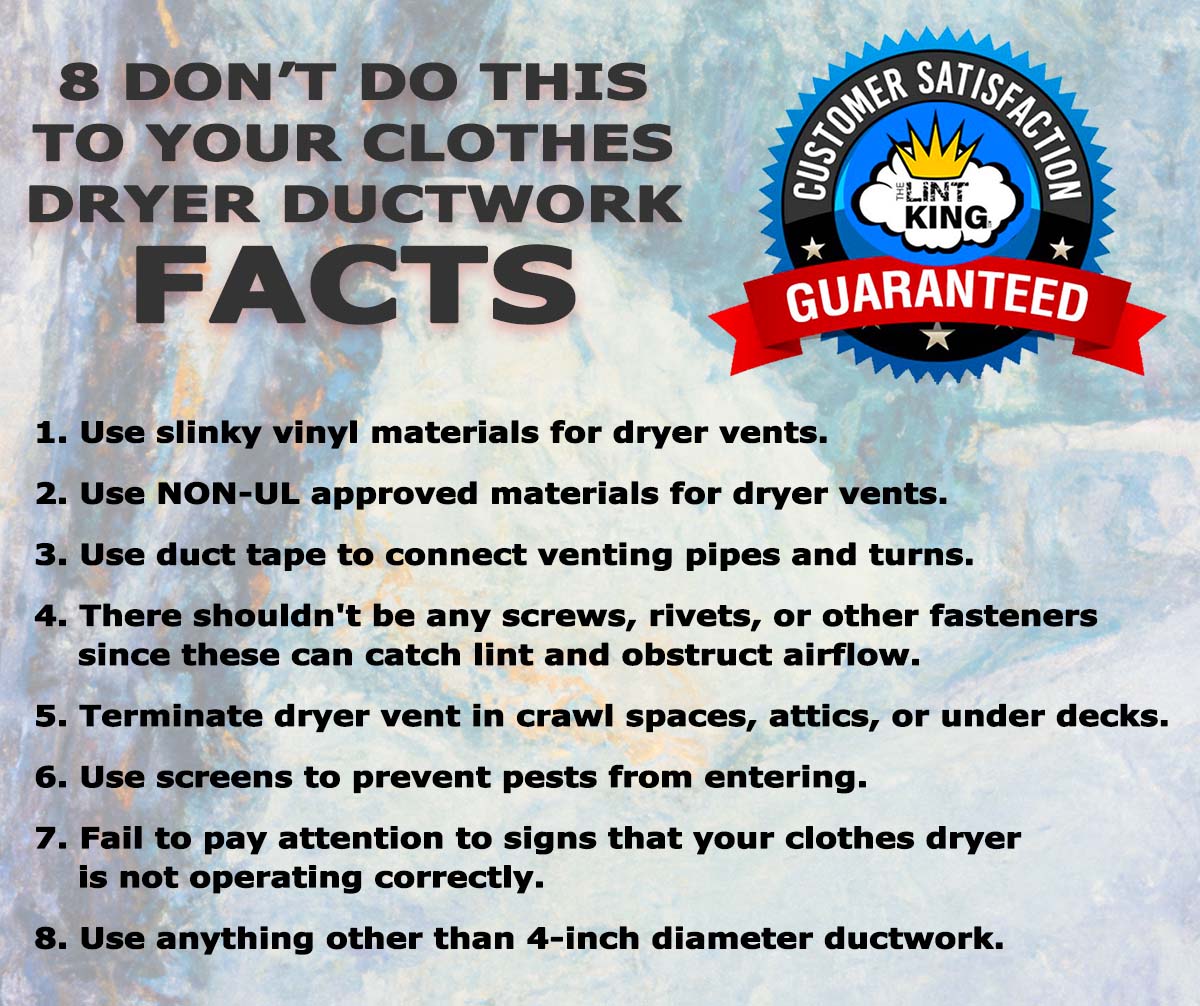
- Avoid Foil or Plastic Ducts: Opt for flexible metal ducts instead, as foil or plastic ducts can easily crush, creating fire hazards.
By consistently following these guidelines, you’ll ensure a safer home and a more efficient dryer.
Learn More About Your Dryer’s Vent
Schedule a Dryer Vent Cleaning With the Experts
The Lint King
The Ultimate Guide to Home and Appliance Maintenance
https://thelintking.com/blog/comprehensive-guide-to-cleaning-your-dryer-vent-safely-and-efficiently
https://thelintking.com/blog/critical-factors-to-understanding-dryer-vent-maintenance
https://thelintking.com/blog/do-i-need-to-clean-my-clothes-dryer-vent